


This article explains how to connect Azure SQL with Pigment to retrieve any SQL query result into a Pigment Block.
As with all other native Pigment Integrations, you first need to configure a Connection in the Integration library page. Once configured, this connection is usable in any Pigment Application that is authorized as a data source. The authorized Applications are defined during the ‘Import Data’ configuration step. Now, let’s see how to configure and use this native integration!
Configuration setup in Azure
Prerequisite
To connect to your Azure environment, Pigment requires a Service account. The SQL server must accept Azure Active Directory (Azure AD) authentication.
This section covers how to configure Azure to connect with Pigment. The process is done in Azure and is broken down in three steps.
- Create a service account by creating an Application and its secret key.
- Grant the required Permissions to the application in your Azure SQL database
- Make your SQL Server visible to Pigment
Step 1. Create an Application
For more information about these steps, you can review Azure’s documentation.
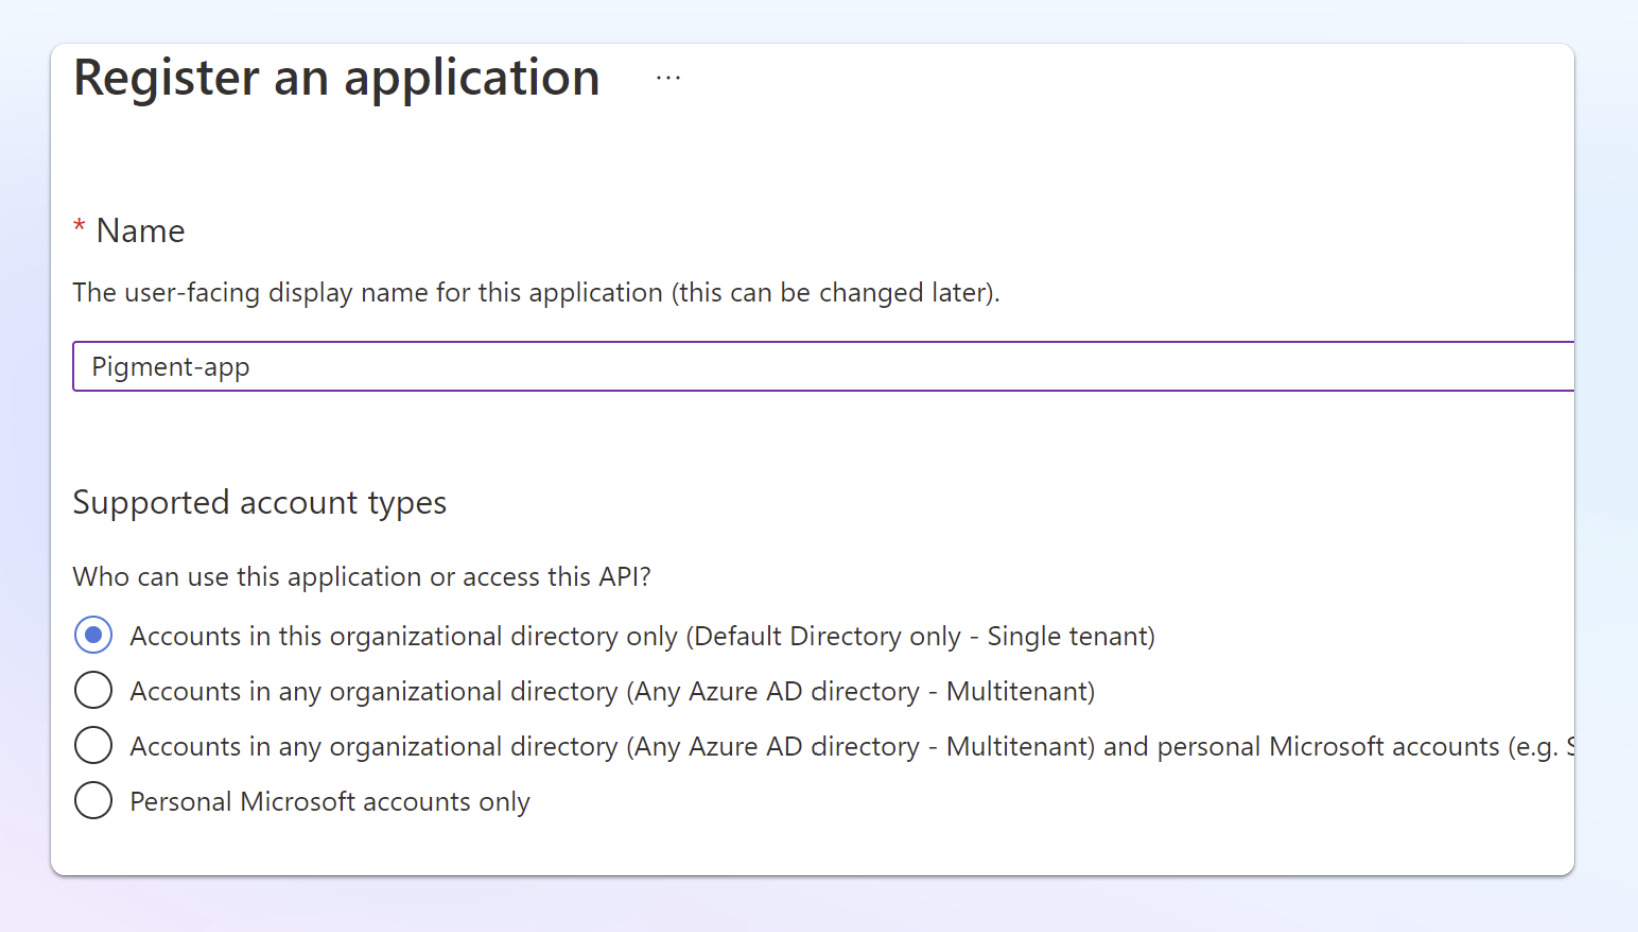
In Azure Active Directory > App registrations, click on “+ New registration” .
Name your application (example: Pigment-app) and select “Default Directory only - Single tenant” option as Supported Account types.
Once the application is created, copy the following:
- Application (client) ID
- Directory (tenant) ID
Now open the “Certificates & secrets” page of the application which was just created and click on “+ New client secret”.
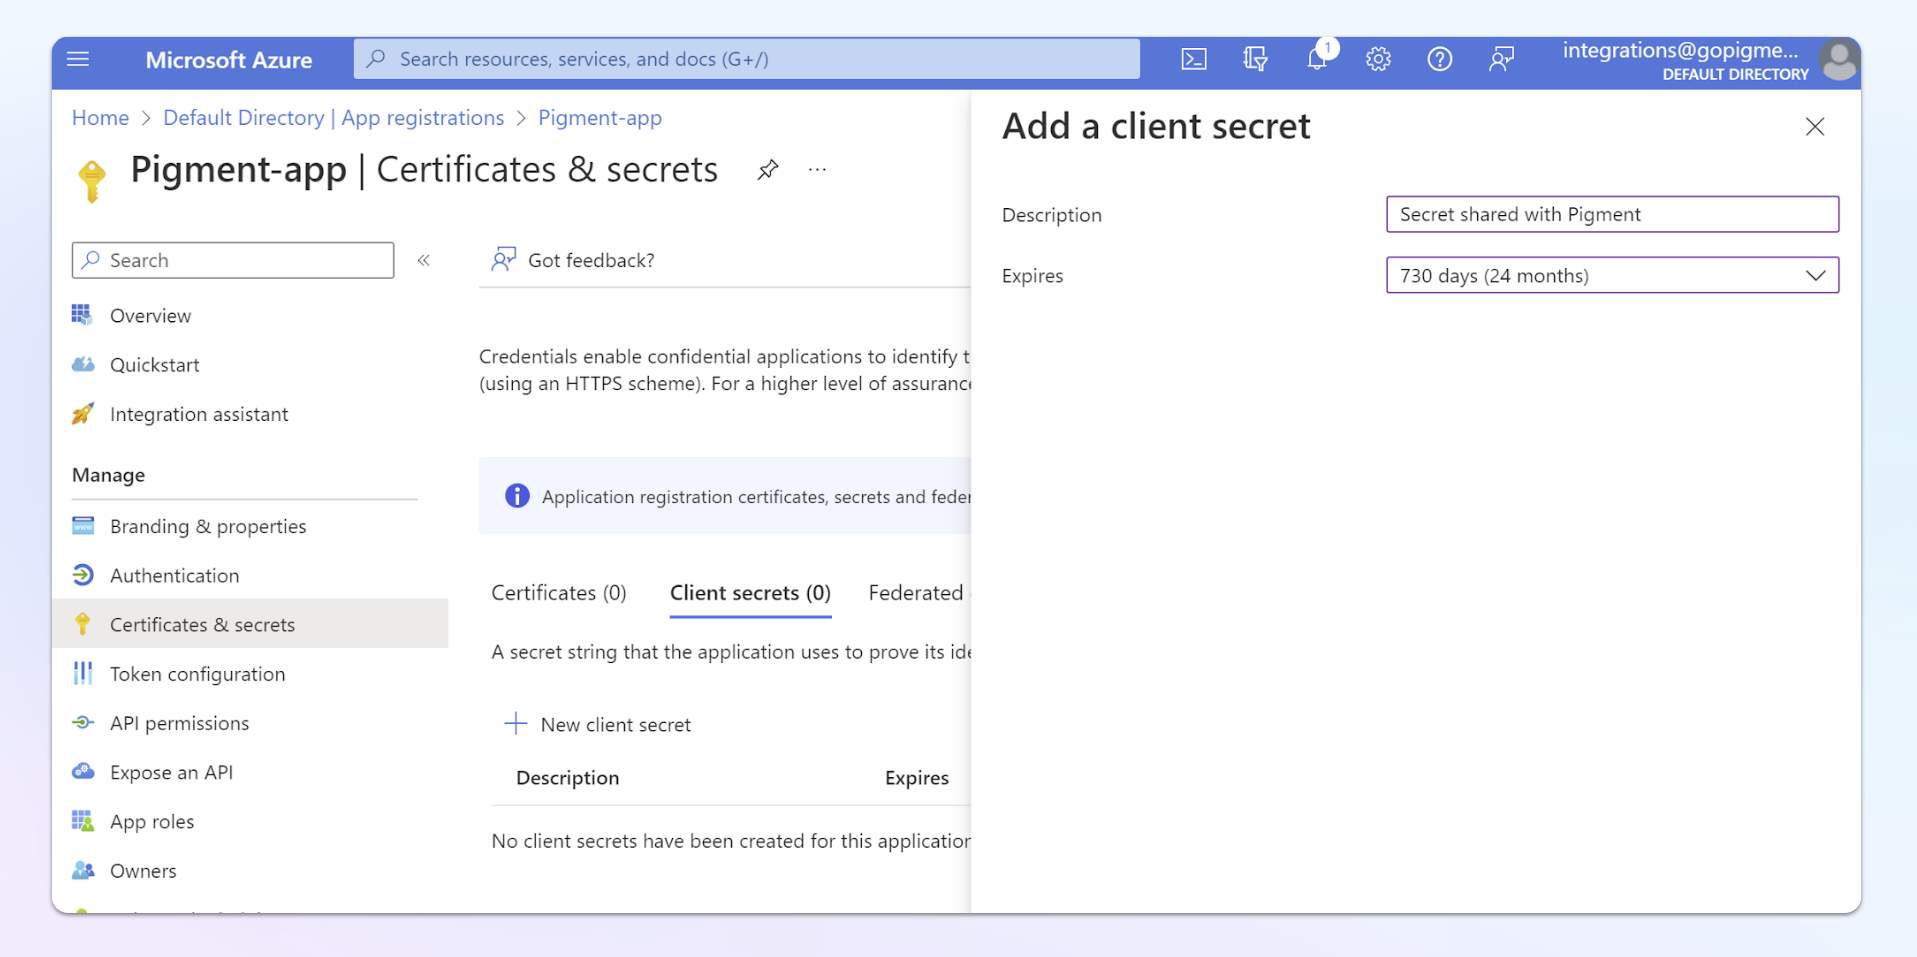
Once created, copy the Secret Value and keep it in a safe place! This secret value is needed to share with Pigment in the next steps of the process.
Warning
Client secret values can only be viewed immediately after creation. Make sure to save the secret before leaving the page.
Step 2. Grant access to the Database
Granting database access to the service account can be done in many different ways. Check with your server administration to see how they prefer to grant access to the application. The methods documented below are examples.
Method 1: Manually granting access to the application:
Execute the following two commands on the database that you want the application to have access to.
Replace [user_name] with the name of the application created during the previous step.
CREATE USER [user_name] FROM EXTERNAL PROVIDER
GO


EXEC sp_addrolemember 'db_datareader', [user_name]
GO
Method 2: Grant access to the application through Group:
Instead of creating a user in the database for the application, it’s also possible to manage access through “Groups”.
First create a group. In the Azure Active Directory > Groups, click on New group. Create a “security group”.
Once the group is created, add the application to the group.
Execute the following two commands on the database that you want the application to have access to.
Replace [group_name] with the name of the Group created before step.
CREATE USER [group_name] FROM EXTERNAL PROVIDER
GO


EXEC sp_addrolemember 'db_datareader', [group_name]
GO
Step 3. Configure the SQL server Network access
To let Pigment reach your SQL server, navigate open the SQL server configuration page and navigate to Security > Networking.
In the Public access tab, check that Public network access is set to Selected Network.
Then in Firewall rules, click on + add firewall rule and allow the following Pigment server IPs to access the SQL server:
35.242.251.111
34.145.54.113
Setting up the Connector in Pigment
Important Note
You must be a Pigment Workspace Admin to configure the connector.
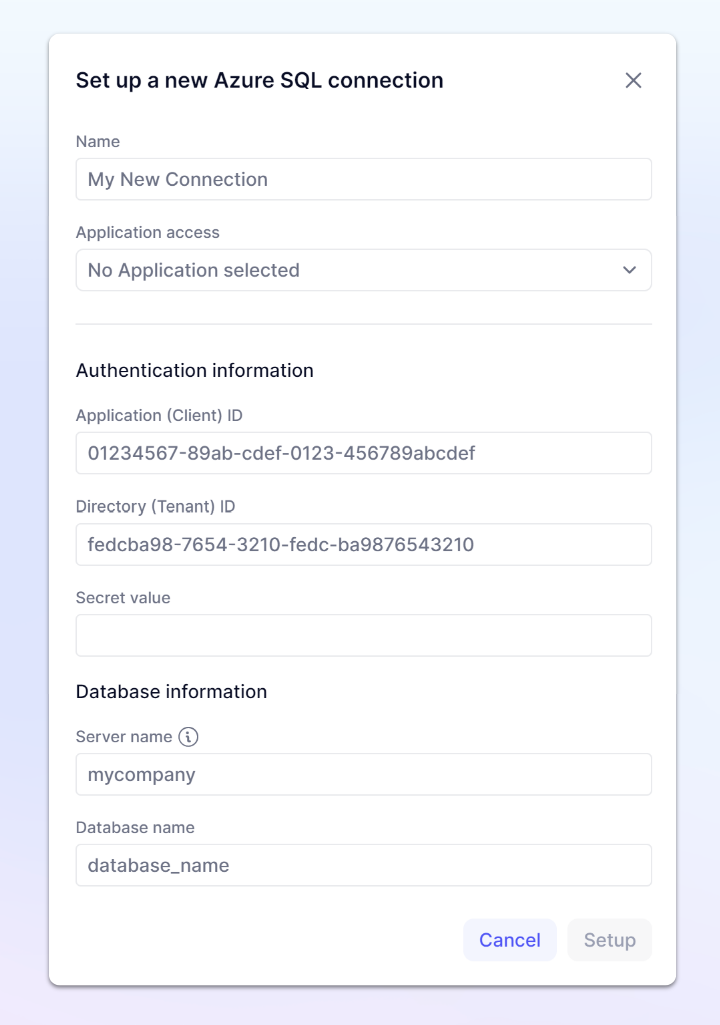
Within Pigment, navigate to the Integration page from your Workspace homepage, and click on “+ Add” on the Azure SQL integration. Then fill out the information about the connection.
| Name: the name of your connection Application access: select the applications to allow using this connection Application (Client) ID: the application ID generated previously Directory (Tenant) ID: the Directory ID of the application generated previously Secret value: the Secret value generated previously Server name: the name of the server you want to connect with Database name: the name of the database to execute the queries in
| 
|
Load Azure SQL data into Pigment
Once the Azure SQL Connection is configured, open an Application with the connection accessible and open the “Import Data” interface for the object you want to import data into.
For example, if you are importing data into a Transaction List, you would open up List and then select Import and Download and then Import .
Instead of “Upload file”, select the Integration option. From here, select the Azure SQL Connection you just configured
Note
If you do not see the connection, navigate back to the Integrations page, and verify that the Application is on the Application Access list.
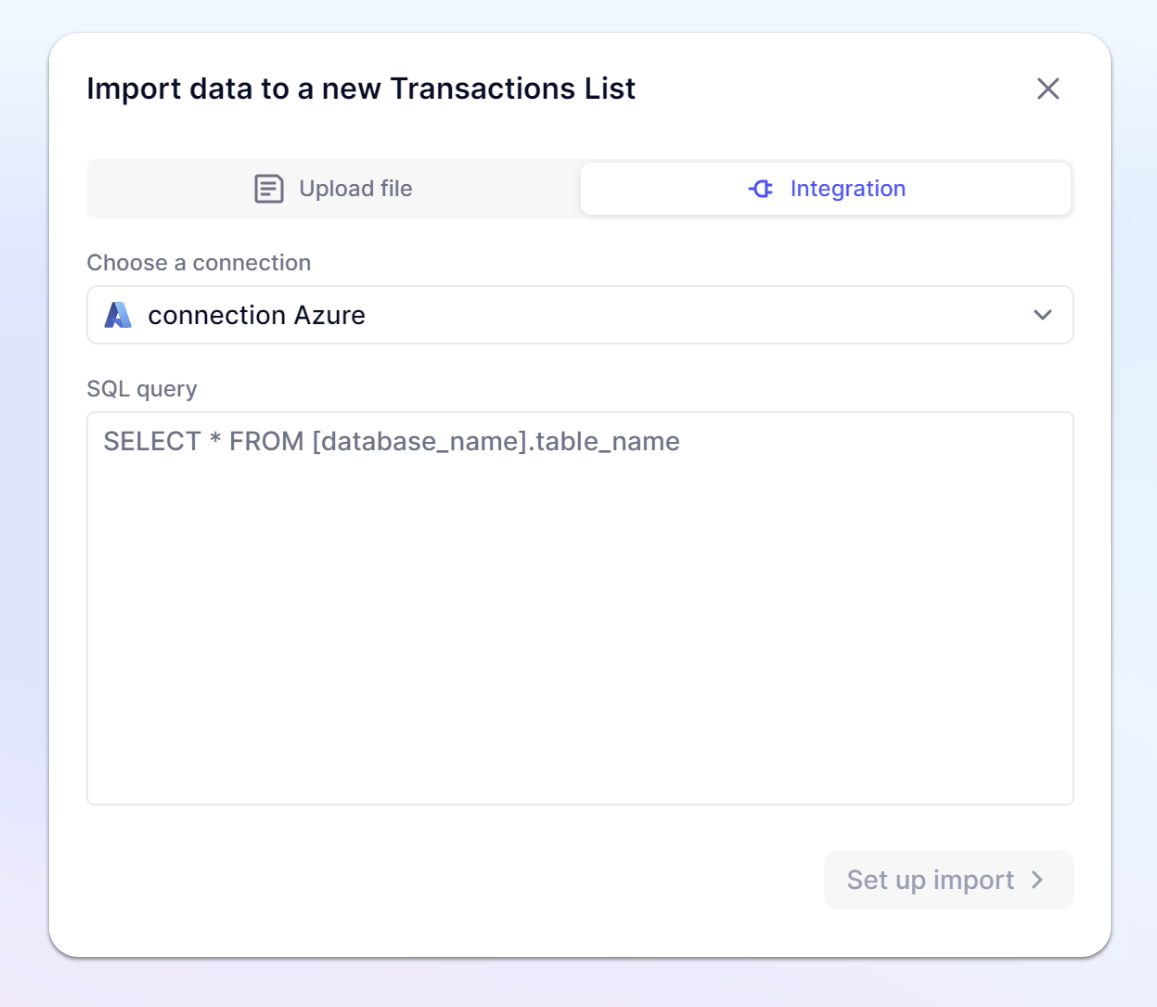
Now, you simply need to input the SQL query you want to load and click on Start Import.
The result of your SQL query will load in Pigment within seconds!