


The Pigment Native Connector for NetSuite allows users to effortlessly load and access real-time data into Pigment, Including Financial, Vendor and Asset data.
This article gives an overview of the steps required to configure the connection and query NetSuite data. You will also find links to a detailed step-by-step guide on how to configure every step as well as some useful links and resources.
For troubleshooting, please refer to the Pigment - Netsuite FAQ to help you navigate the most common errors.
Before you start: Prerequisites
Use the list below to ensure you have appropriate access and resources:
Prerequisites
 You have full Administrator access to your Organization’s instance in Production - This is for the initial setup only. Once configured, end-users will be able to query data from NetSuite based on their read permissions.
- You have Administrator access to Pigment to set up integrations.
- You have downloaded a Pigment Restlet Script that allows you to pull data from NetSuite. You can find the script here.
How does the integration work?
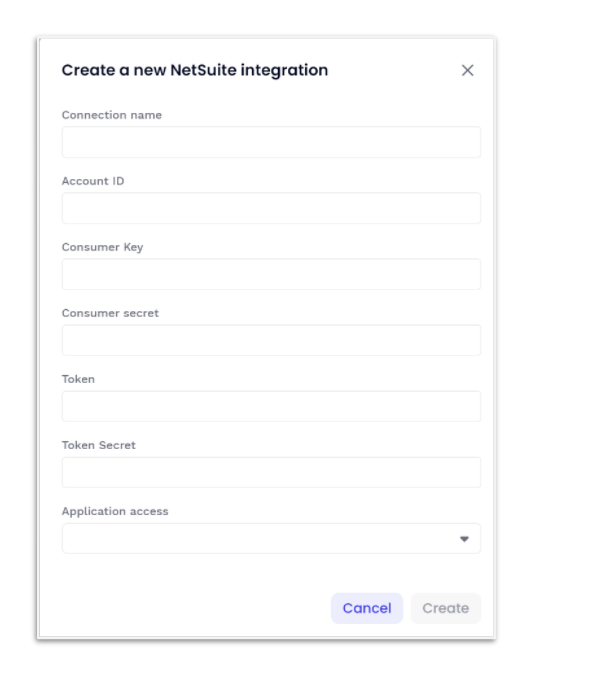
Pigment is using NetSuite’s Token Based Authentication integration(TBA) framework to enable users to load data natively in real-time. The main input parameters required to set up a NetSuite TBA are the 5 following credentials:
- Account ID
- Consumer credentials: Consumer key & Consumer secret
- Token credentials: Token ID & Token secret
When you retrieve the credentials above, plug them in the Pigment Integrations Panel for NetSuite. Not sure how to get these credentials? Go to the next section and follow the step-by-step guidelines ![]()

Configuration Summary
Let’s go over the main actions required to establish a successful connection:
NetSuite Configuration
Enable the TBA connection
![]() Ensure Integration features are enabled
Ensure Integration features are enabled
![]() Retrieve the ‘Account ID’
Retrieve the ‘Account ID’
![]() Create Integration and retrieve Consumer Key and Consumer Secret codes
Create Integration and retrieve Consumer Key and Consumer Secret codes
![]() Create a User and assign an existing or new User Role
Create a User and assign an existing or new User Role
![]() Create Token and retrieve Credentials
Create Token and retrieve Credentials
![]() Upload and Deploy Restlet script
Upload and Deploy Restlet script
Create a Saved Search and retrieve the ID
![]() Create a new Saved Search or update an existing one.
Create a new Saved Search or update an existing one.
![]() Retrieve your Saved Search ID.
Retrieve your Saved Search ID.
Pigment Configuration
- Set up a new NetSuite Integration using the 5 TBA Credentials.
- Import your data sets using the Saved Search ID associated with the report.
- View and refresh NetSuite data in your Pigment environment

![]() Important
Important ![]()
- Some steps are pre-requisites for other Tasks. Follow these steps in the order listed for a smooth configuration
- Tokens can be described as non-physical users to which you can assign roles, like any other NetSuite user. The role assigned to the Pigment Integration Token must have sufficient read and write data access, in addition to generic setup permissions to enable integrations.
Now that you understand the overall integration setup and required steps, let’s deep dive into each step:
Step-by-step guidelines
NetSuite: Connection Steps
Before getting started, ensure you have appropriate access or are able to collaborate with your NetSuite administrator or consultant. A NetSuite administrator performs the following steps in the NetSuite Production environment:
![]() Enable Integration Features
Enable Integration Features
Log in as an Administrator to enable the NetSuite features required for the connection.
-
Go to Setup > Company > Enable Features.
- Under the SuiteCloud subtab, check the below features:
![]() SOAP Web Services
SOAP Web Services
![]() Token-Based Authentication
Token-Based Authentication
- Under the Company subtab, check the below features:
![]() File Cabinet
File Cabinet
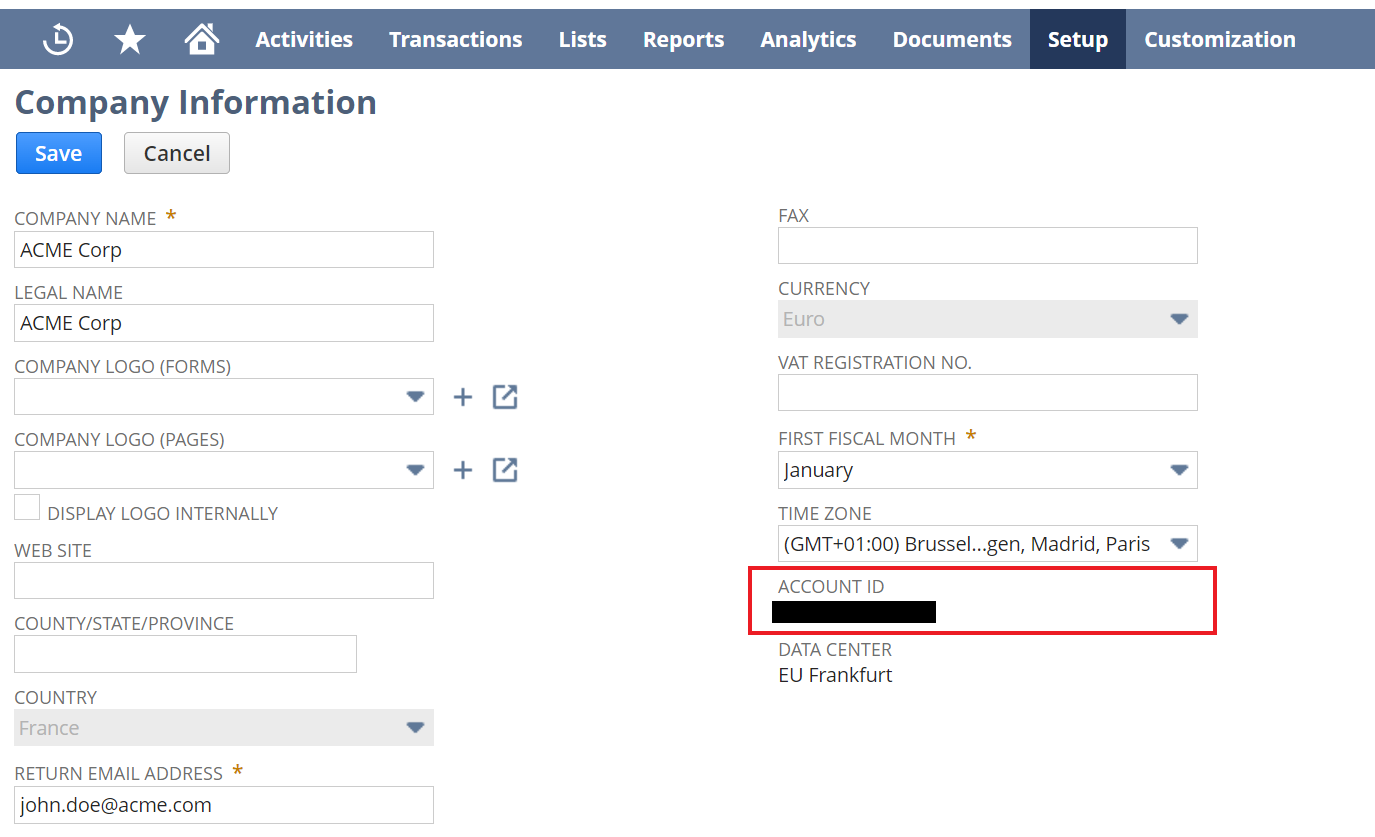
![]() Retrieve Account ID
Retrieve Account ID
- Go to Setup > Company > Company Informations.
- Copy and save the Account ID - You will need this ID as an input in Pigment.
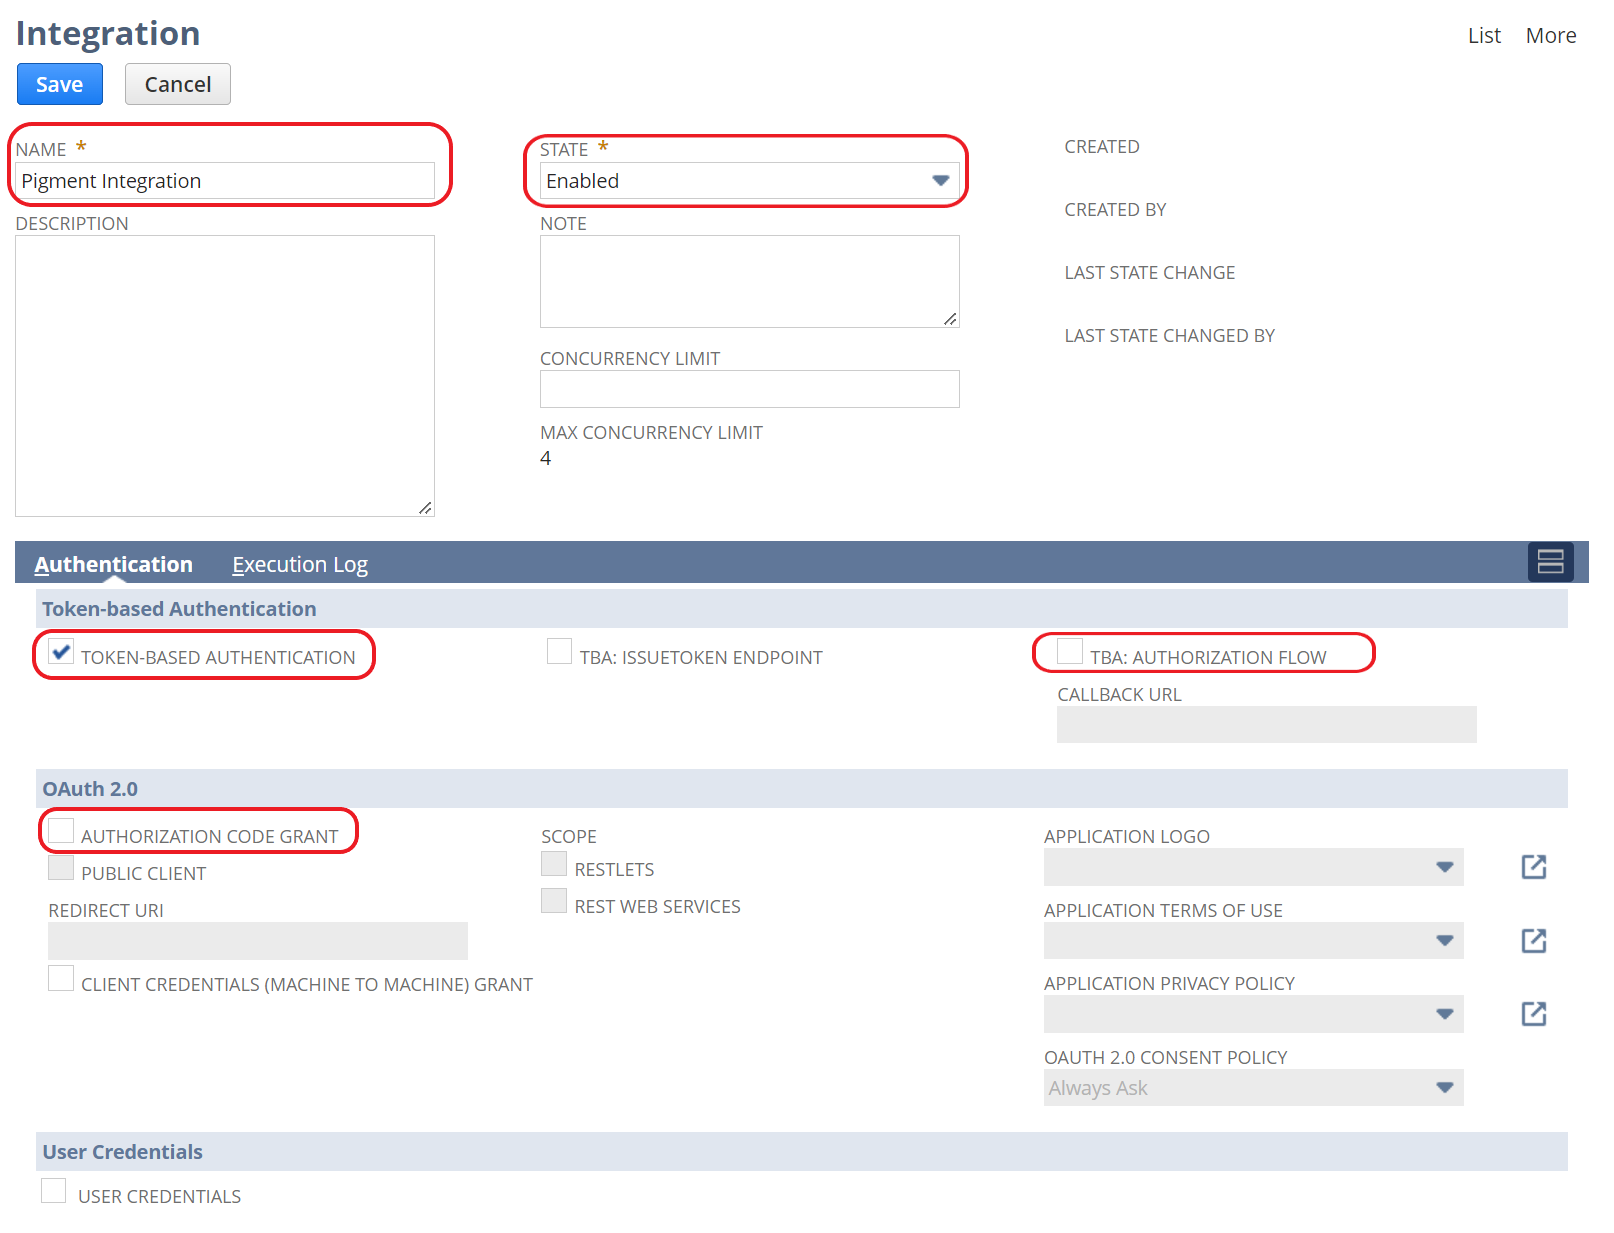
![]() Create Integration and retrieve Consumer Key and Secret
Create Integration and retrieve Consumer Key and Secret
- Go to Setup > Integration > Manage Integrations > New.
- Enter a Name
- Verify that ‘State’ is “Enabled”.
- Uncheck ‘TBA: Authorization Flow’.
- Uncheck ‘Authorization Code Grant’ in OAuth 2.0 section.
- Verify that ‘Token-Based Authentication’ is checked.
- Click on save.
7.Copy and save the consumer Key and Secret displayed.
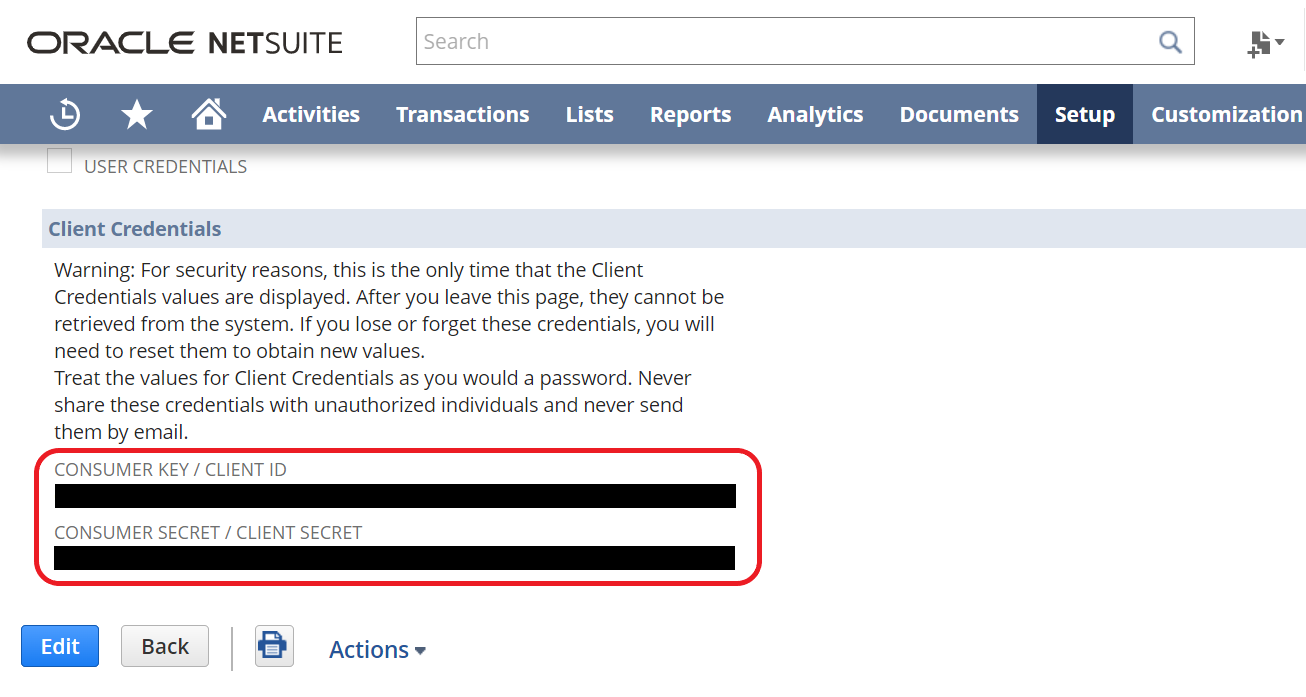
Warning: This is the only time that the Client Credentials values are displayed! Don’t forget to copy them and keep them somewhere safe!
![]() Create a User and assign an existing or new User Role
Create a User and assign an existing or new User Role
In this step, you create an Integration user and a user role that will allow Pigment to connect using the Token-Based Authentication as well as read data with the appropriate level of access.
What is the difference between a user and user role?
![]() User: Defined by a user’s credentials i.e name and email - Can correspond to a physical (an employee) user or non-physical
User: Defined by a user’s credentials i.e name and email - Can correspond to a physical (an employee) user or non-physical
![]() User Role: Defined by a set of permissions and can be attributed to one or many users. If a user is assigned a role, their access is following the role unless there are add-on permissions attributes to the user directly that expand the level of access they have
User Role: Defined by a set of permissions and can be attributed to one or many users. If a user is assigned a role, their access is following the role unless there are add-on permissions attributes to the user directly that expand the level of access they have

To Create a User:
- Go to Lists > Employees > Employees > New.
- Enter the name and the email address. For a Pigment integration user, the best practice is to use a generic email address that is static over time, as opposed to employee credentials to prevent any interruptions
- Click the Access subtab.
- Check Give Access and Send Notification Email.
- Assign a password of your choice.
- Select the Role that you need to assign and click Add.
- Use an existing role such as the Controller or CFO role or create a new Role.
Update the role with additional Permissions
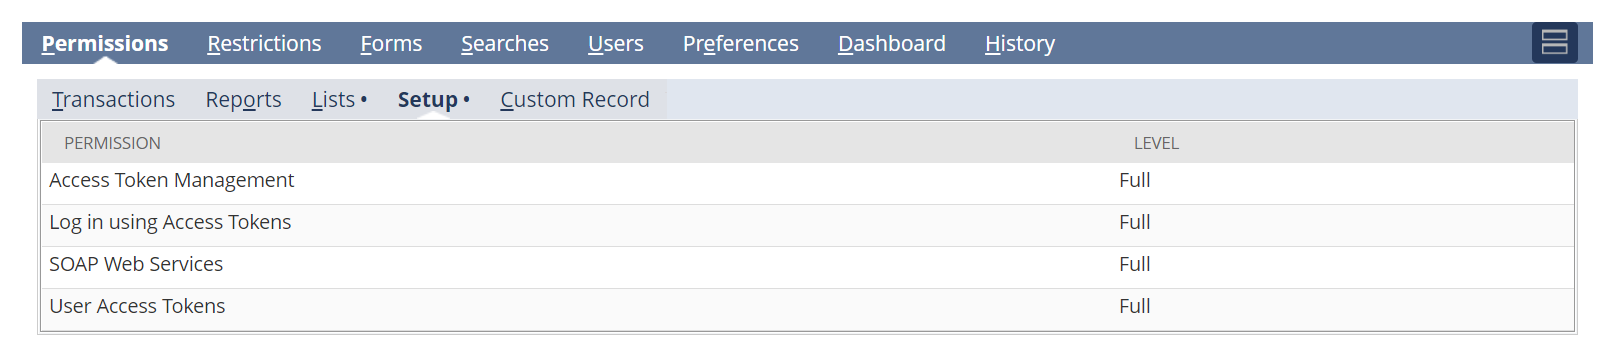
For the connection to be successful, add the following Setup Permissions to the role:
- Access Token Management: Full
- User Access Tokens: Full
- Login using Access Tokens: Full
- SOAP Web Service: Full
You also need the List Permission:
- Documents and Files: Full
- Persist Search: Create

Then you need to grant access the the data you plan to export to Pigment (the data which is diplayed in the saved search). Add the needed Transaction Permissions to the role:
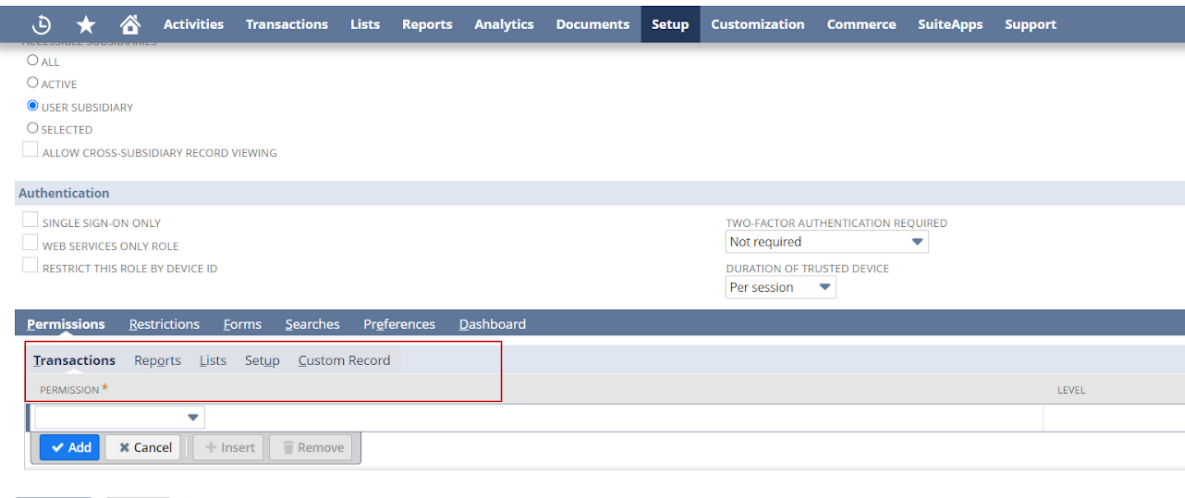
Warning: if Transaction permissions are not correctly configured, Pigment will load incomplete data. Double check the number of rows received by Pigment with the one you expect!
![]() Create credentials Token
Create credentials Token
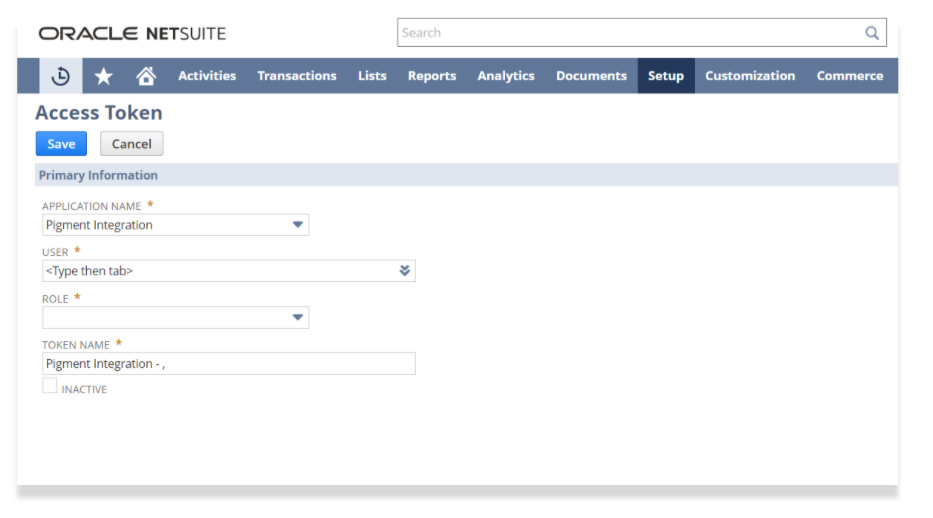
- Go to Setup > User/Roles > Access Tokens > New.
- Select the correct parameters from the previous steps.
- Application Name -> Select the Integration created in step 3 from the dropdown menu
- User -> select the Pigment Integration User
- Role -> select the Integration role assigned to the user
- Copy and save token credientials
![]() Upload and Deploy Restlet script
Upload and Deploy Restlet script
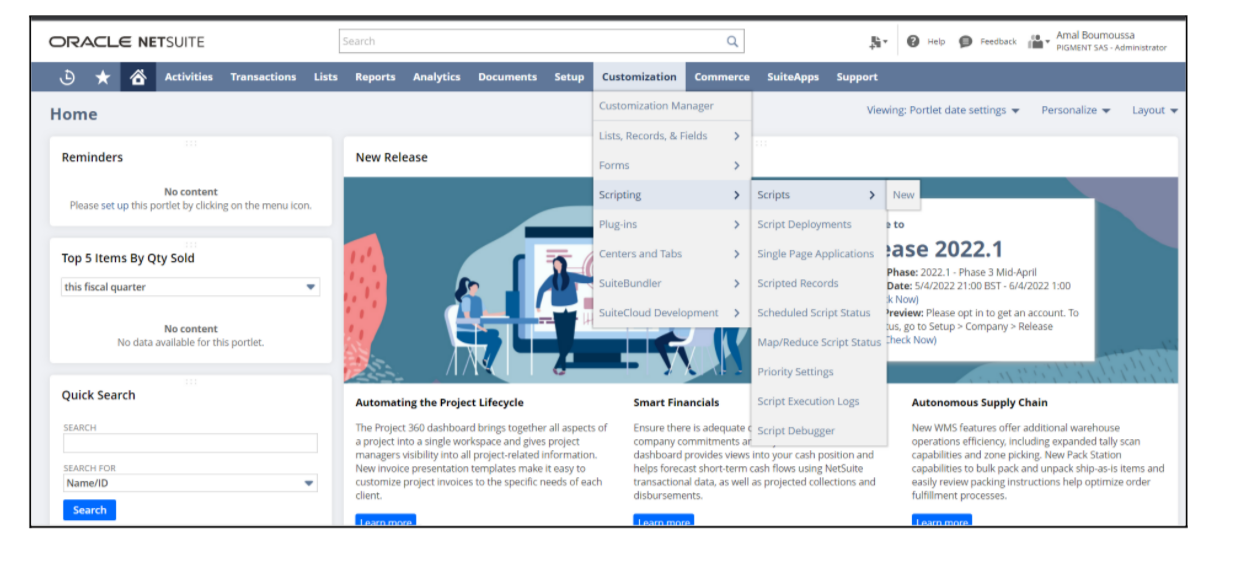
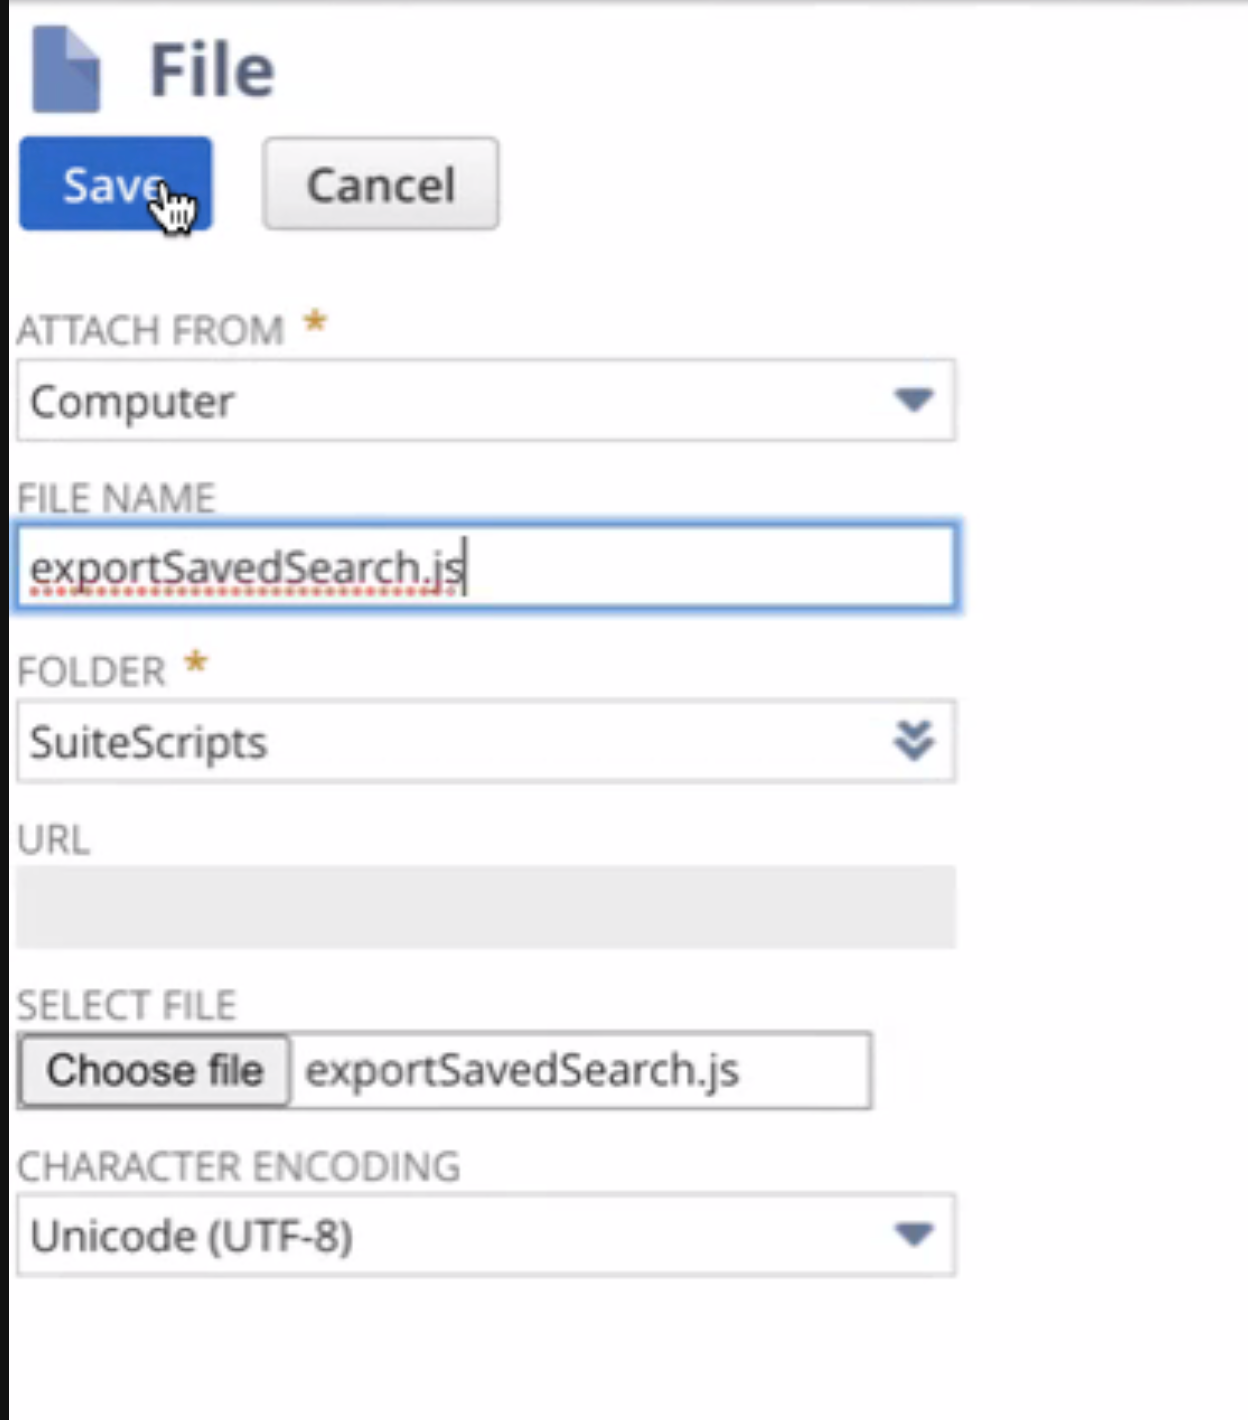
- Go to Setup > Customization > Scripts > New, and click on the + next to Script File.
- Use the file provided by Pigment to you directly as the script file and leave the File name field empty
- 🚫Do not change the name of the physical file provided to you 🚫
- Click on “Save“ in the File Pop-up, and then click on “Create Script Record”.
- In the Name field put exportSavedSearch.js
- Make the Script ID= “exportSavedSearch”
- Click on “Save”
- Click on “Deploy Script”
- Set status to Released and the LOG level to Error select the Integration role.
- Click on “Save”
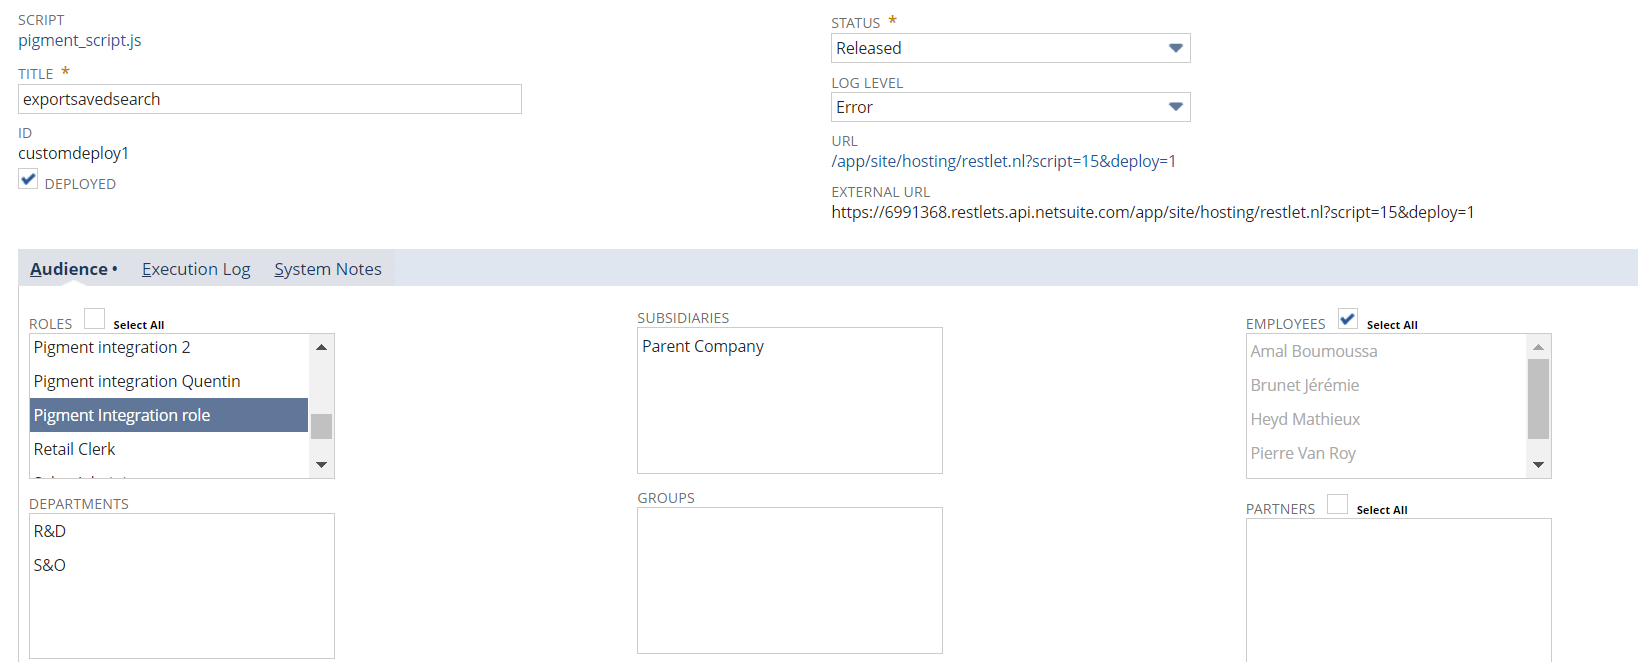
Warning: if you need to redeploy the script, please delete and recreate the script. Pigment only support: “deploy=1” (check the end of the URL or EXTERNAL_URL)
NetSuite: Create a Saved Search to import
![]() Create Saved Search and retrieve ID
Create Saved Search and retrieve ID
Saved searches are tables of information that allow users to retrieve business data from NetSuite. If you create a saved search in NetSuite, you will be able to use the associated Search Id to create transaction lists that replicate your query results.
- Go to Reports > New Saved Search ( or Reports > Saved Searches > All Saved Searches > New).
- Specify search criteria and results and save the saved search
![]() Retrieve the ID of your Saved Search
Retrieve the ID of your Saved Search
- If you are using an existing Search list, you can retrieve your Search under Lists > Search and use the ID column.
Pigment: Configure Integration and data import
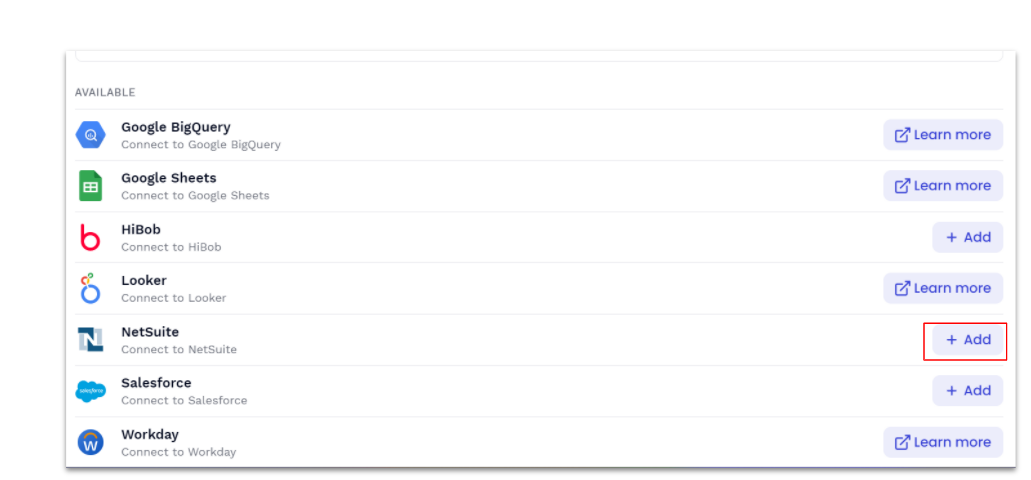
- Log into Pigment and navigate to the Integrations tab.
- Choose the NetSuite option from the available Connectors and Click Add.
- Input all parameters retrieved from the NetSuite Configuration steps.
- Create a new Transaction list.
- Select the Integration option
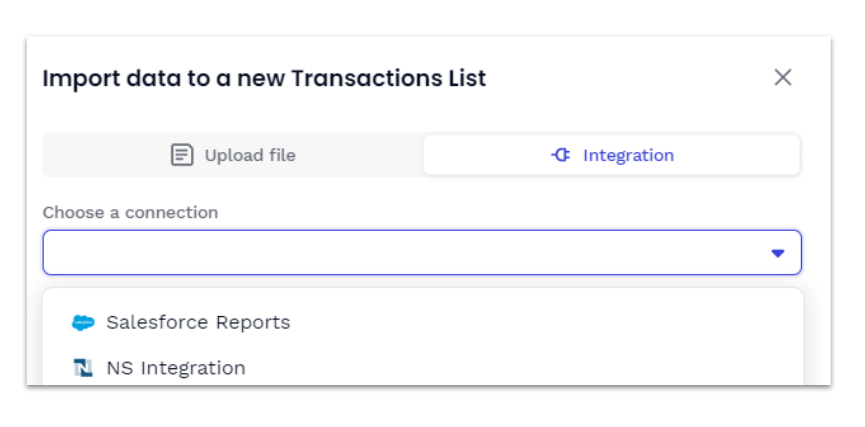
- To create the new Transactions list from a NetSuite source, specify the Search ID.
- To begin the NetSuite import to the Transactions list, select Start Import.
Et voila! You can now keep importing any saved search results using just the ID! Don’t forget to checkout the NetSuite best practices articles 💫!
Questions ? Ask us in the comments section!!