


When establishing the process for inviting Members to your Pigment workspace you have different options to control who can be added. This article discusses your identity and provisioning settings and how to configure them.
Table of Contents
What are the different options for identity and provisioning settings?
You can configure three different options: Restricting Domains, setting up a Single Sign-On, and using SCIM Provisioning. Restricting domains allows Security Admins to control which email domains can be invited into a workspace. Single Sign-On (SSO) lets Members sign in through their own identity provider. SCIM is used to systematically manage users through an identity provider’s directory. For Single Sign-On (SSO) please contact support to activate, for SCIM and Domain restriction there is more information below.
How to enable email domain restriction
Pre-requisites for email domain restriction
To configure email domain restriction, you need to be a workspace Security Admin.
- From the workspace level, click on Settings in the sidebar.
- Navigate to the Members, click on Identity & provision settings.

3. Click the toggle next to Restrict invitations to email addresses at specific domains
4. Click + Add domain to add new domains to be restricted.
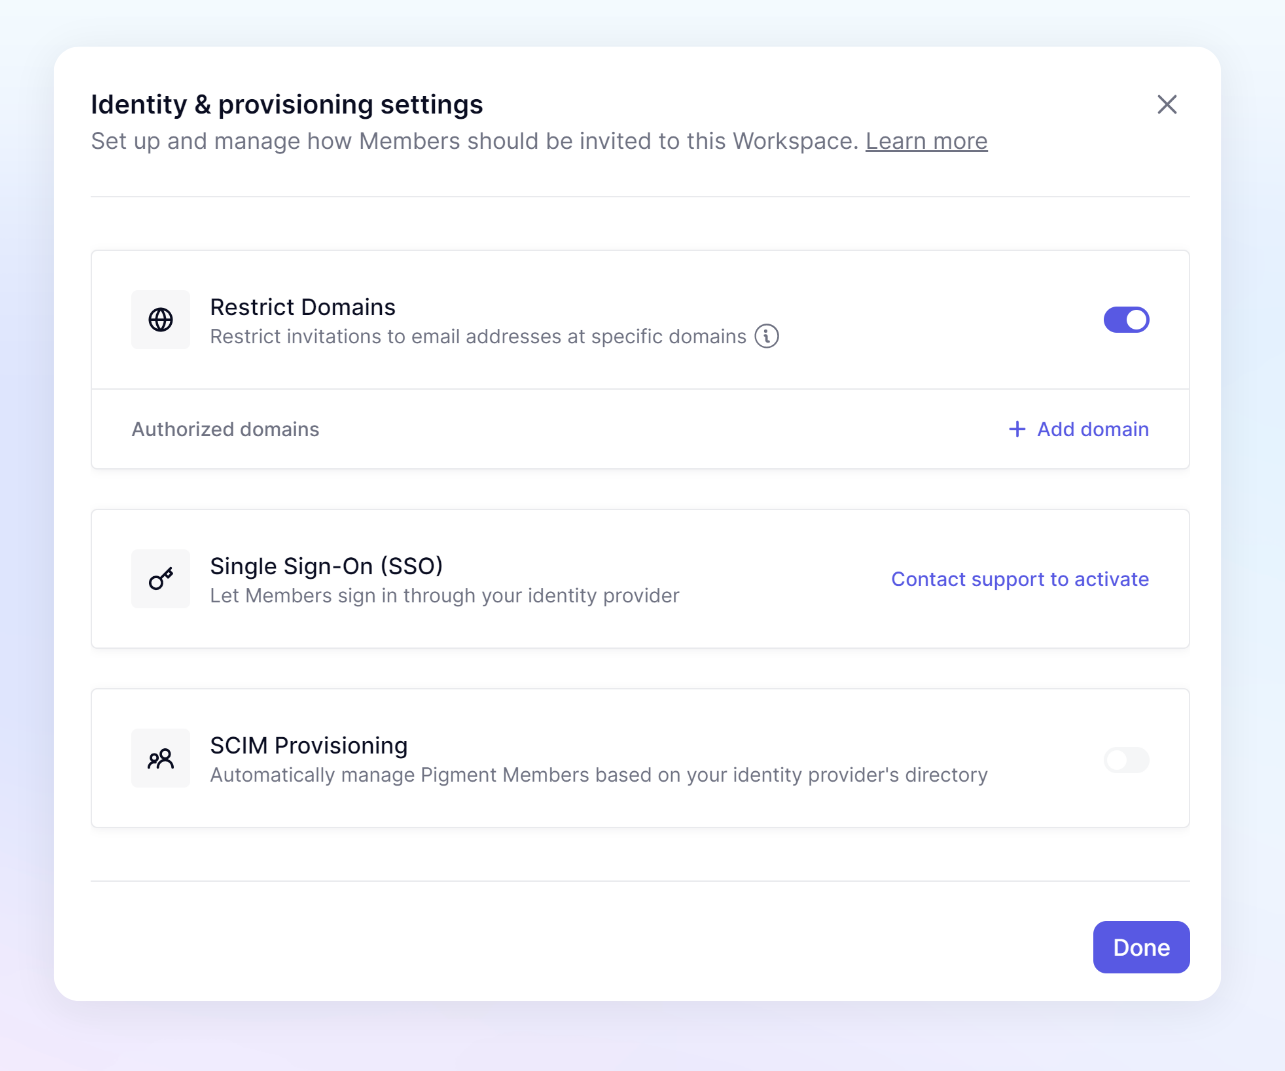
- A modal named Add a new domain will appear. You can only add one email domain at a time. The format is just the domain name. For example, if you wanted to add users whos email is Joe@gopigment.com, you would just type in gopigment.com .
- Click Close.
Note: This setting only impacts new invitations. It will not impact existing users in any way.
Delete domains to the authorized domains list
To add a domain to the authorized domains list follow the process above. To delete a domain, simply click on the delete icon 🗑️ next to the domain you wish to remove.
Info: Pigment Support Account (support@gopigment.com) will by-pass the authorized domains list.
What is SCIM and what can you do with it
SCIM is an industry standard to provide cross-provider identity management. It lays out a standard schema of attributes that apply to a user, allowing all services consuming a SCIM request to understand what to expect and how the values should be used.
Pigment leverages SCIM to provide to our customer’s IT the ability to, directly from their Identity Provider solution:
- Create (invite) new Members in Pigment
- Update a Member’s Information (name)
- De-activate a Member
- Re-activate a de-activated Member
- Find and List Members in Pigment (by their email)
We do not support Group provisioning, nor any specific Role attribution for users yet.
Once SCIM is provisioned, you will not be able to invite members or deactivate Members through Pigment.
Setup SCIM Provisioning in Pigment
First, enable SCIM in Pigment for your Workspace.
Pre-Requisites
Here are the requirements for you to be able to setup SCIM:
- You must have a SAML SSO configuration set-up with your Identity Provider for Pigment
- Your Identity Provider must support SAML 2.0 with a Core User Schema
- You must have access to Pigment as a Security Admin Member
Supported Identity Providers
Pigment’s automatic provisioning can be used with any IdP which supports SCIM for user management.
We have provided detailed steps within this documentation for the following IdPs:
- Okta
- OneLogin
- Microsoft Entra ID
If you use another Identity Provider not listed above that supports SCIM provisioning and you need assistance, please contact our Support team directly.
Enable SCIM and generate an API Token
- As a Security Admin, open the Members page (Settings → Members) and then the Identity & provisioning settings dialog.
- Double check that Single Sign-On is enabled (contact our Support team to set that up otherwise).
- Enable SCIM with the SCIM Provisioning toggle.
- Generate a new Token using the + Add token button and choose its expiration based on your security policies
- Take note of the provided URL & Token (you’ll need them both in your IdP)
More about our Provisioning API Tokens
Tokens are not private to the member who created them, but to the workspace itself. If the creating member is de-activated in the future, the token will still be valid until its expiration date.
Multiple tokens can be created and active at the same time, for rotation purposes.
Tokens can be revoked at any time (using the 🗑️ button). Before revoking a token, please make sure it isn’t used in your Identity Provider anymore.
Setup SCIM in the Identity Provider
Then, setup your Identity Provider with the API URL & Token provided in the Pigment SCIM Dialog.
Here are detailed steps for our supported IdPs:
Okta
A preconfigured Pigment Integration is submitted in the Okta Integration Network, but unfortunately waiting for a review and not yet available.
In the meantime, here’s how to proceed with a custom, manual configuration:
Login to the Okta’s Admin Panel, open the Applications menu and view details for your Pigment SAML 2.0 Application.
- In the General tab, activate the Provisioning checkbox
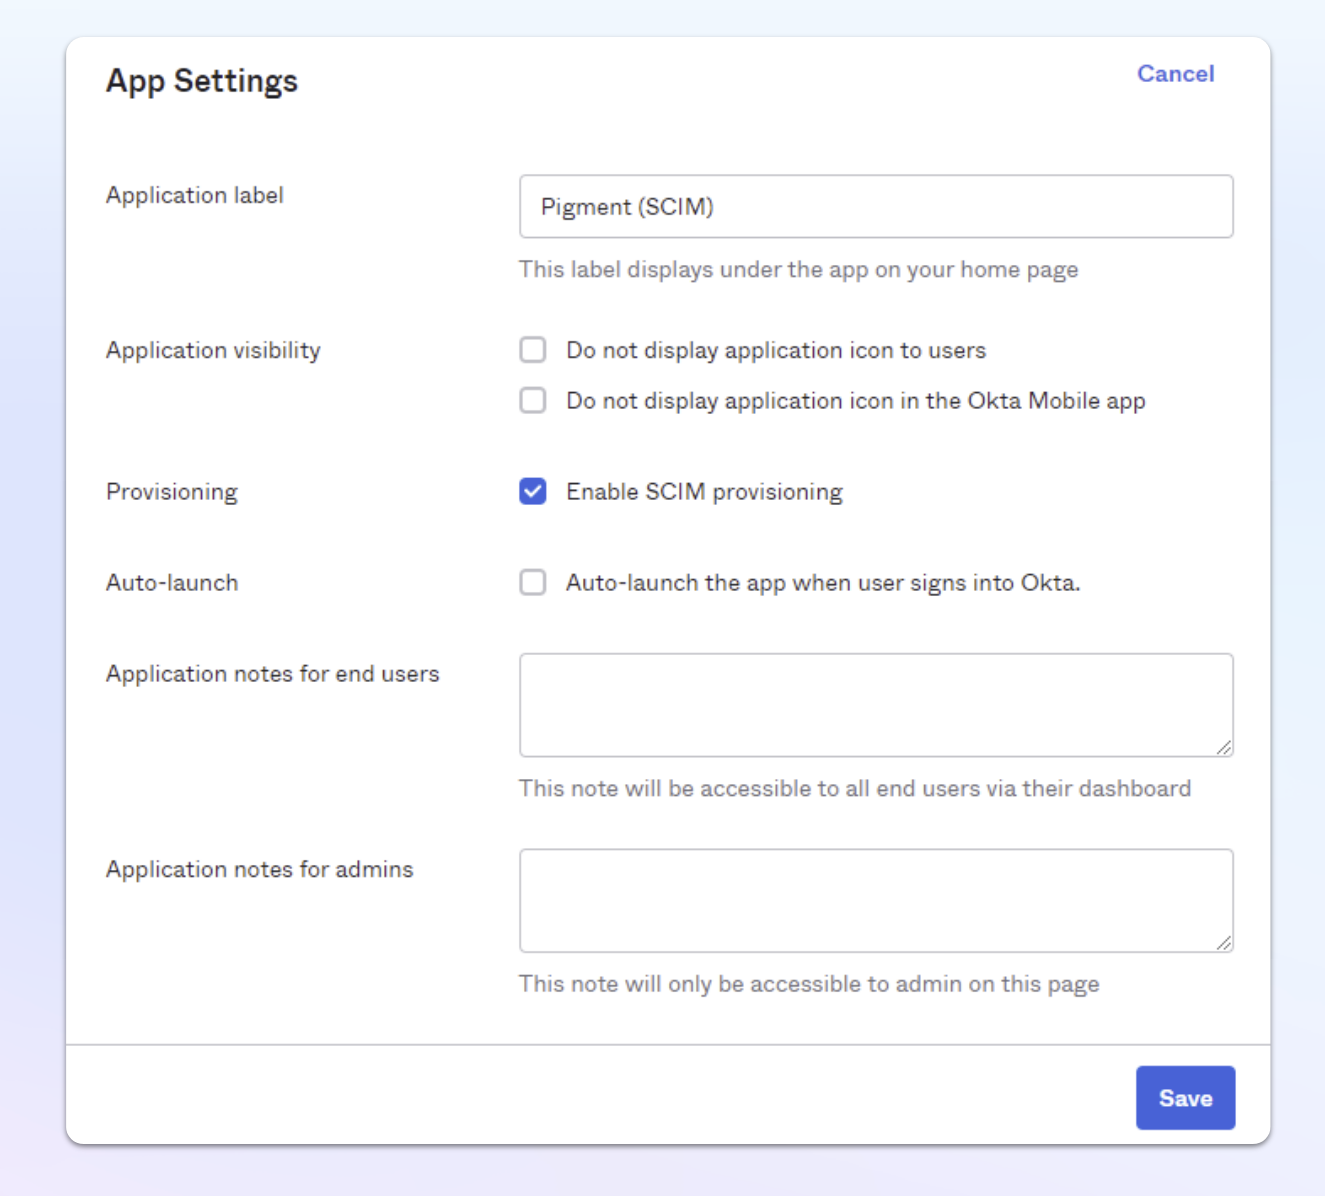
- Head to the Provisioning tab and in Integration → SCIM Connection, click Edit
-
SCIM connector base URL: paste the URL from the Pigment Dialog
-
Unique identifier:
userName -
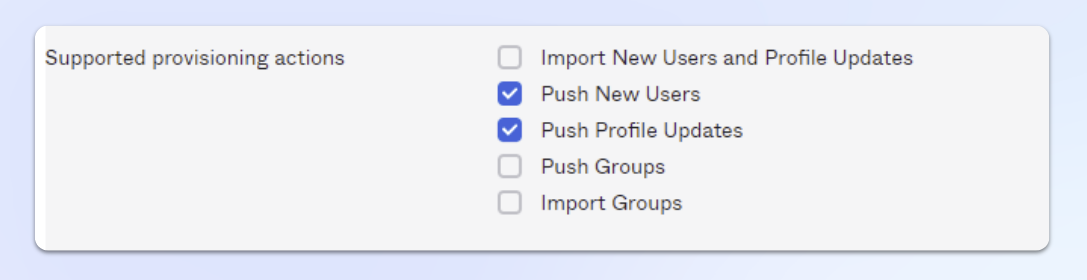
Supported actions: check both and only Push New Users & Push Profile Updates
-
Authentication: select HTTP Header
-
HTTP Header Authorization: paste the API Token from the Pigment Dialog
-
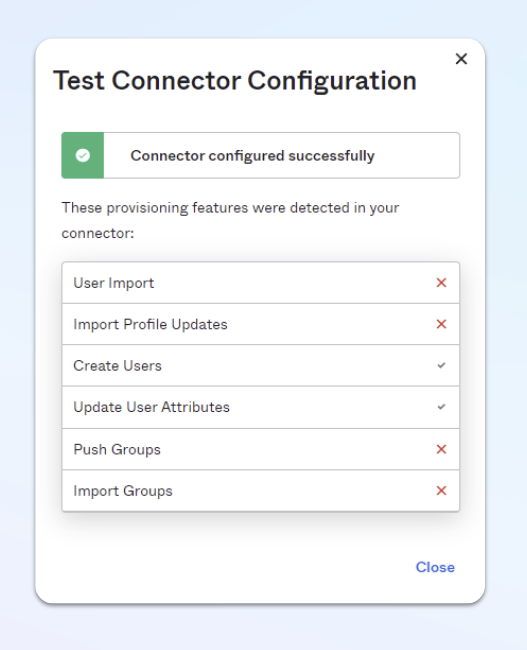
- Click on Test Connector Configuration. The test should be successful
- Click Save
- Back on the Provisioning Tab, in the To App Settings panel, click Edit
- Enable:
- Create Users
- Update User Attributes
- Deactivate Users
- Click Save
The SCIM integration is now complete, and any user assigned to the Okta Application from now on should be created in Pigment.
OneLogin
Pigment does not provide a preconfigured OneLogin Application yet. In the meantime, here’s how to proceed with a custom, manual configuration:
Login to the OneLogin’s Admin Panel and open your Applications list.
You might already have a SAML Application for Pigment, make sure it can support a SCIM v2 Core configuration.
Otherwise, click on Add App and select SCIM Provisioner with SAML (SCIM v2 Core) to create a new one.
Then, in the Application Configuration section:
-
SCIM Base URL: paste the URL from the Pigment Dialog
-
Leave Custom Headers empty
-
SCIM Bearer Token: paste the API Token from the Pigment Dialog
-
SCIM JSON Template: use the following snippet:
{
  "schemas": [
    "urn:ietf:params:scim:schemas:core:2.0:User"
  ],
  "id": "{$user.email}",
  "userName": "{$user.email}",
  "displayName": "{$user.display_name}",
  "name": {
    "givenName": "{$user.firstname}",
    "familyName": "{$user.lastname}"
  },
  "emails": [
    {
      "value": "{$user.email}",
      "primary": true,
      "type": "work"
    }
  ]
} -
Click on Enable
In the Provisioning menu:
- You can now Enable provisioning and choose which operations requires an approval.
- When users are deleted or suspended OneLogin, you can either choose to Delete or Suspend them; the operations are identical in Pigment (we don’t delete users and keep them suspended for history purposes).
Click Save.
Microsoft Entra ID
Pigment does not provide a preconfigured Microsoft Entra ID Application yet. In the meantime, here’s how to proceed with a custom, manual configuration:
- Login to the Azure Portal and open your Microsoft Entra Directory. Select Enterprise applications.
You might already have a SAML Application for Pigment, select it and go to the app overview in step 4. - Click on New Application and select Create your own application to get started.
- In the Application creation sidebar, enter Pigment as the name, then select Create.
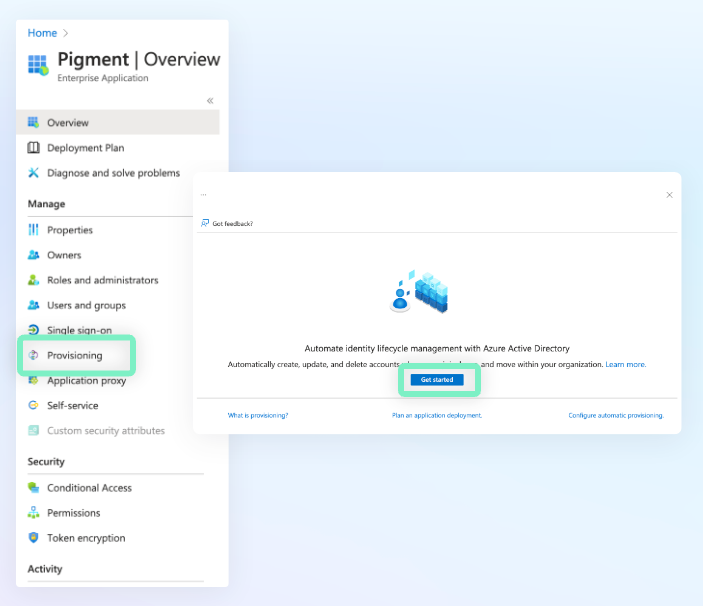
- On the resulting app overview screen, go to Provisioning, then press get started.
- Then, fill in the following:
- Provisioning mode: Automatic
- Tenant URL: paste the URL from the Pigment Dialog
- Secret Token: paste the API Token from the Pigment Dialog
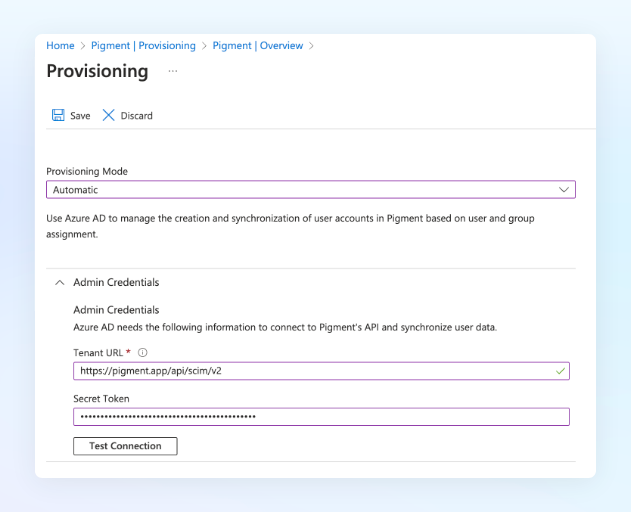
Completed provisioning settings in Entra ID
- Test the connection and if successful, press Save.
Mapping Attributes
You may need to change the default mappings between the Entra ID attributes and Pigment on the provisioning page. This is done by expanding the Mappings section and changing which values in Entra ID correspond to the attributes in Pigment. See the User Attributes Mapping section below for more information on the minimum fields required.
Entra ID Provisioning will be disabled initially, to enable it:
- Go back to the Enterprise Application's Provisioning Overview page by navigating from the left hand sidebar.
- Provisioning will show as disabled, you can press Start Provisioning or alternatively you can select Provision on Demand to sync a specific user or group immediately. This is useful should you want to preform a test in advance of a full sync.
- When you're ready, go to the Provisioning section in the left-hand navigation and set the Provisioning Status to on. This will enable automatic user management for this Enterprise Application.
The SCIM integration is now complete. Entra ID will manage user creation, updates, and deactivations within Pigment based on changes in the app assignment scope within Entra ID.
User Attributes Mapping
Pigment requires and maps the following SCIM User Attributes:
userName: the user’s login email, e.g. john.doe@example.comdisplayName: the full Display Name for the user, e.g. John Doe
Note: The SCIM standard holds attributes for a lot more fields (such as job title, phone numbers, etc.) that are not part of Pigment’s user profile. Any extra data sent in addition to the required fields noted above will be ignored and not stored.