


This article is an introduction to access rights in Pigment. It explains the essential basic concepts and is required reading before you start implement Member access rights in Pigment.
What are access rights?
Access rights are a form of data security that allows you to configure what data individual users can see and interact with.
So, how are access rights different to permissions?
- Permissions define the specific actions a user can do in Pigment, such as creating new Metrics, Boards, and Lists.
For example, permissions determine if a Member can create a new Board or write different formulas. However, access rights determine if a user can read or write data for a specific country or department on a Board. - Access rights are strictly related to data and how users can interact with that data.
Here are some useful definitions for understanding access rights in Pigment:
- Default access rights. Define what data a user can read or write, and each Role is assigned default access rights. They are a form of data security that allows you to configure what data individual users can see (
Read) and modify (Write).
- Access rights rules. Create custom Metrics with the data type Access Rights to control data access in specific parts of your model. These rules are also called specific access rights. For example, you can set a rule to give users read-only access to data for a particular country or department on a Board. Access rights rules have two scopes:
ApplyandIgnore.
- Access rights configuration. The collective setup of access rights and the access rights rules, these are visible in the Data access rights tab in the Roles, permissions & access page.
Where are access rights created in Pigment?
Each Role is assigned default access rights, specifically Read and Write access, and can be viewed in the Roles, Permissions, and Access page.
If you need to apply specific additional access rights, then you create rules in a Metric with the data type Access Rights. It defines how Members can interact with data. You use this with a User List Dimension, and with any other Dimension List on which you want to apply data security.
For example, if you wanted to give users access to different Country data, you create your Metric using a User List and a Country Dimension List. When the Metric is created, you then assign that Metric to data using rules.
The number of required access rights Metrics depends on your security needs. However, it’s certain that you’ll use multiple Metrics and multiple functions, including the ACCESSRIGHTS function, for a more scalable set-up.
Access rights options
- Types of Data Access
- Define the Scope of Access Rights Rules
- Define Where Access Rules Apply
- Using Multiple Access Rights Rules on a Dimension
Types of data access
When you create an access rights Metric, you need to assign the read and write settings for users. You’ll see there are two separate options for both settings:
- Read/Write. These options allow users to read or write data.
- No Read/ No Write. These options prevent users from reading or writing data.
If you need to:
- Hide data from a user, set this to No Read / No Write.
- Give a user read-only access, set this to Read/ No Write
- Give a user write-only access, set this to Read and Write.
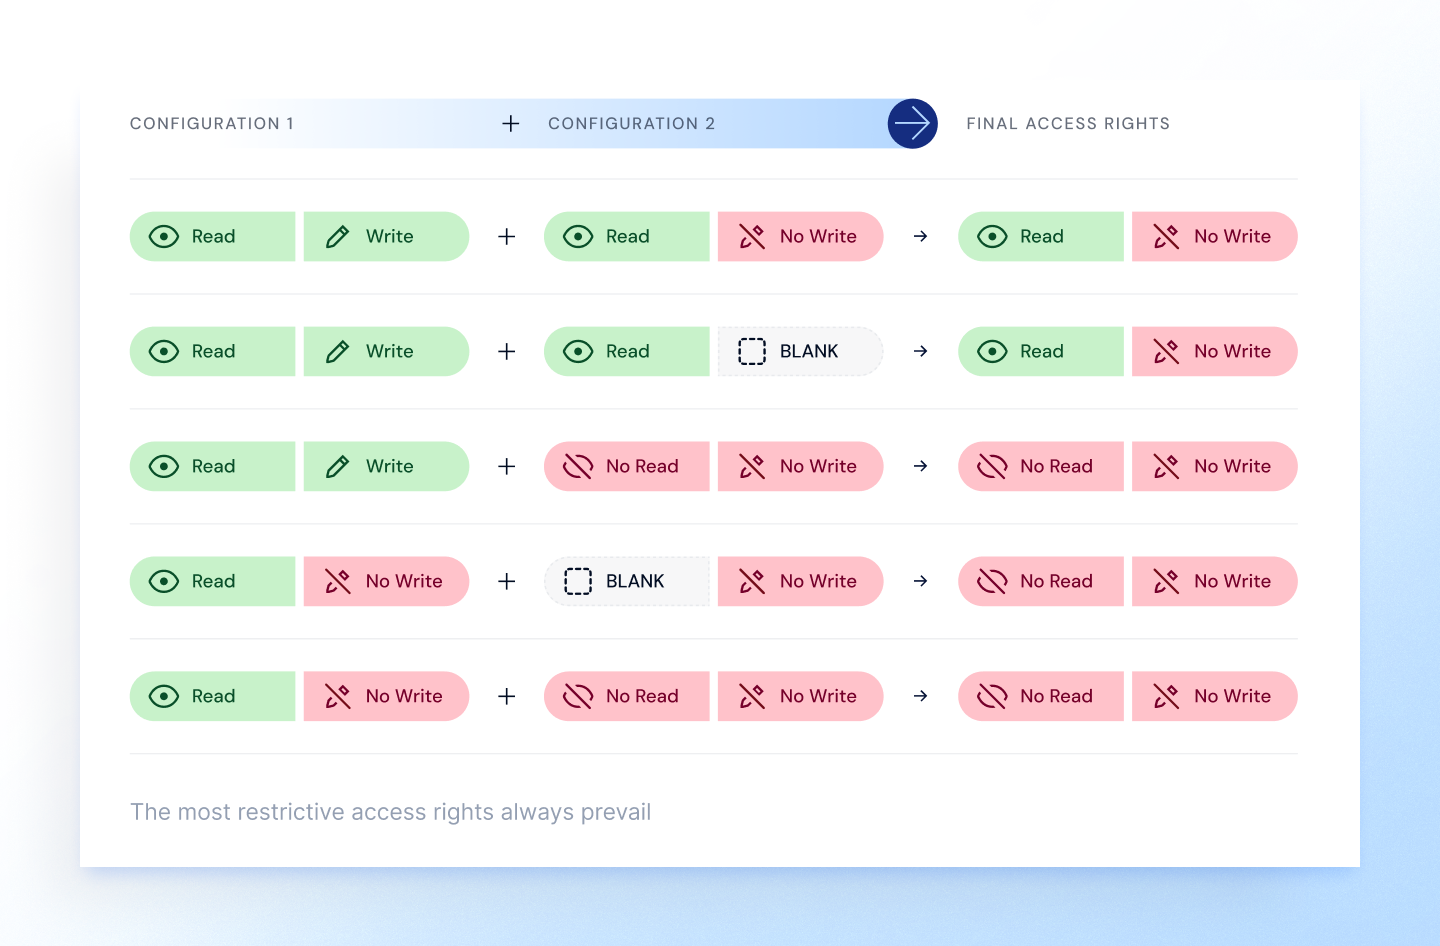
When you apply access rights in multiple Metrics that reference the same Dimension and user combination, the most restrictive setting always overrides the least restrictive settings. This is explained in greater detail in the image below.
Define the scope of access rights rules
The access rights configuration within the User roles Metric is applied to the entire Application by default. However, when you create new rules, you need to define the scope of the rule.
There are two options, Apply or Ignore:
Applyis used to define which parts of the Application this rule is enforced.Ignoreis used to limit the scope of an existing rule.
For example, you could set up an access right rule to Apply to every Metric that contains the Employee Dimension. However, there may be specific Metrics where you don’t want to apply this rule. In this situation, you create a second rule, set it to Ignore, and apply this new Ignore rule to the excluded Metrics.
Define where access rules apply
After you decide if a rule is used to apply or to remove access rights, you have to define where in your model that it applies. This option protects data primarily in Metrics, but also in Lists.
You can select:
-
Specific Metrics.
Select one or more Metrics that contain the Dimensions used in your access rights Metric.
If you created an access rights Metric that used the User List and the Country List, you could select Specific Metric(s) that contained the Country list.
-
All Metrics using specific Dimensions.
Assign this rule to all present and future Metrics that contain Dimensions used in your access rights Metric.
For example, if your access rights Metric contained a Dimension called Department, then this rule is applied to all Metrics containing the Department Dimension.
-
Specific List Properties. Define on which Lists and on which Properties in this List these access rights should apply to.
For example, specific access rights for the Annual Salary property of my Employee list. - List Item values. This rule filters out values in the List according to the Metric of access rights. It allows you to protect data in Lists, based on Properties.
For example, you can setReadaccess on Annual Salary property based on a Dimension formatted Country Property. This allows certain Members to view some salaries depending on the Country Property.
Considerations when applying access rights to List Item Values
- This rule applies only to the selected Properties of the targeted Items, and not to the Metric data associated with those Items. Specifically, if a Member lacks access to an Item's name (or to be precise, its default display name), the name appears blank in a Metric. However, this does not hide or protect the data within the Metric itself. To restrict access to Metric data, apply a rule targeting the Metric directly. You can do this by selecting either the Specific Metric(s) or the All Metrics using specific Dimension(s) options for that Metric.
- Unlike other types of rules, this rule only restricts access when the List Property has a value. If the Property is blank, access is automatically granted. This ensures that Members can add new Items to a List and populate the Property values. If this behavior doesn’t suit your needs, consider using the Specific List Properties rule type instead.
Using multiple access rights rules on a Dimension
The most restrictive permission in Pigment is No Read / No Write. When you have multiple access rights rules applied to a Dimension, this permission applies.
Most user roles, except for the Reader role, come with Read/Write permissions for the entire Application by default. You need to consider this when you start to apply access rights rules.
Default access rights are determined by Role. If the Role default Access Rights is set to No Read / No Write, it overrides other access rights settings due to it being the most restrictive setting.
For example, a Member with the Reader role set to No Write cannot edit data, even if another rule allows writing. The most restrictive setting always takes precedence when multiple rules apply to the same part of an Application.
When access rights are defined in multiple Metrics, the most restrictive rule prevails. The exception to this is if you create a rule using the Ignore option, indicating that the Users roles configuration doesn’t apply to a specific set of data.
As a default setting, we recommend that you set access rights in Roles to No Read and/or No Write based on the sensitivity of your data. This ensures Members have no immediate access to the data when they’re invited into the Application.
Assign access rights to Roles
You need to define permissions and access rights when you set up a new Role in Pigment. The access rights that you define for a Role are considered to be default setting when no other rules are applied.
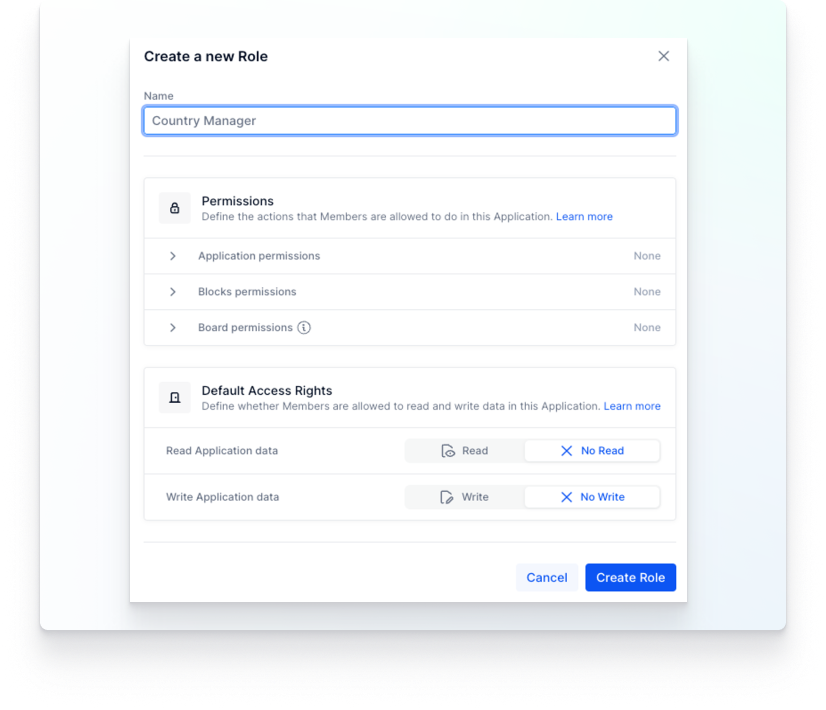
For example, let’s say a Member’s access rights is set to Read/ Write. This user can edit or write any data if no other rules are applied.
This is why you need to apply a more granular security setting to indicate precisely which data Members can see, read or edit. You can also establish where in Pigment an access rights rule doesn’t apply, or where it should be ignored. For more information on how access rights work with Roles, see About Roles, Permissions, and Access Rights.
Preview a Member’s access rights
When you set up Access Rights for a Member, there are three possible states:
-
No Access. The Member cannot see the data.
-
Partial Access. The Member can read some of the data but not all of it. Depending on their configuration, they may be able to edit data.
-
Full Access. The Member can read all of the data. Depending on their configuration, they may be able to edit that data as well.
Depending on your security needs, you can assign access rights to individual Members and adjust them to different levels of granularity within an Application. This flexibility allows you to specify exactly which data each user can read, write, or hide.