


Pigment Automations uses a series of up to 10 linked actions to create a workflow to defined Members. This article discusses how to set up a workflow in Automations.
This topic is for Pigment Members who are workflow owners. A workflow owner is responsible for creating the series of tasks that make up the workflow, monitoring their status, performing actions on the tasks and workflow, such as updating assignees, sending reminders and so on. If you’ve been assigned a task in a workflow and need more information on performing it, see Interact with Your Assigned Tasks.
Before you Begin
- Permissions. You need the
Configure AutomationsPermission to be able to Create/Edit/Delete/Enable/Disable an Automation. This Permission has been granted to all Members having theConfigure BlocksPermission. You need theView HistoryPermission to view the execution details of each Automation.
- Task knowledge. This topic assumes that you understand how to create notifications and tasks in Pigment. If you need more information setting these up, we recommend that you read these articles:
- Notification settings. Each Pigment Member configures how they want to receive their notifications. This can’t be done by other Members as it is a personal setting. See Pigment's Notification Center for more information on notifications.
- Define the triggering Metric. The first step in creating an automated notification is to define or create the Metric that triggers the Automation and then creates the notification. This Metric can be user input driven, such as a request for approval, or formula driven, for example writing a formula that is equal to true. We recommend that you select or create this Metric before you begin creating your new notification.
Set Up a Workflow
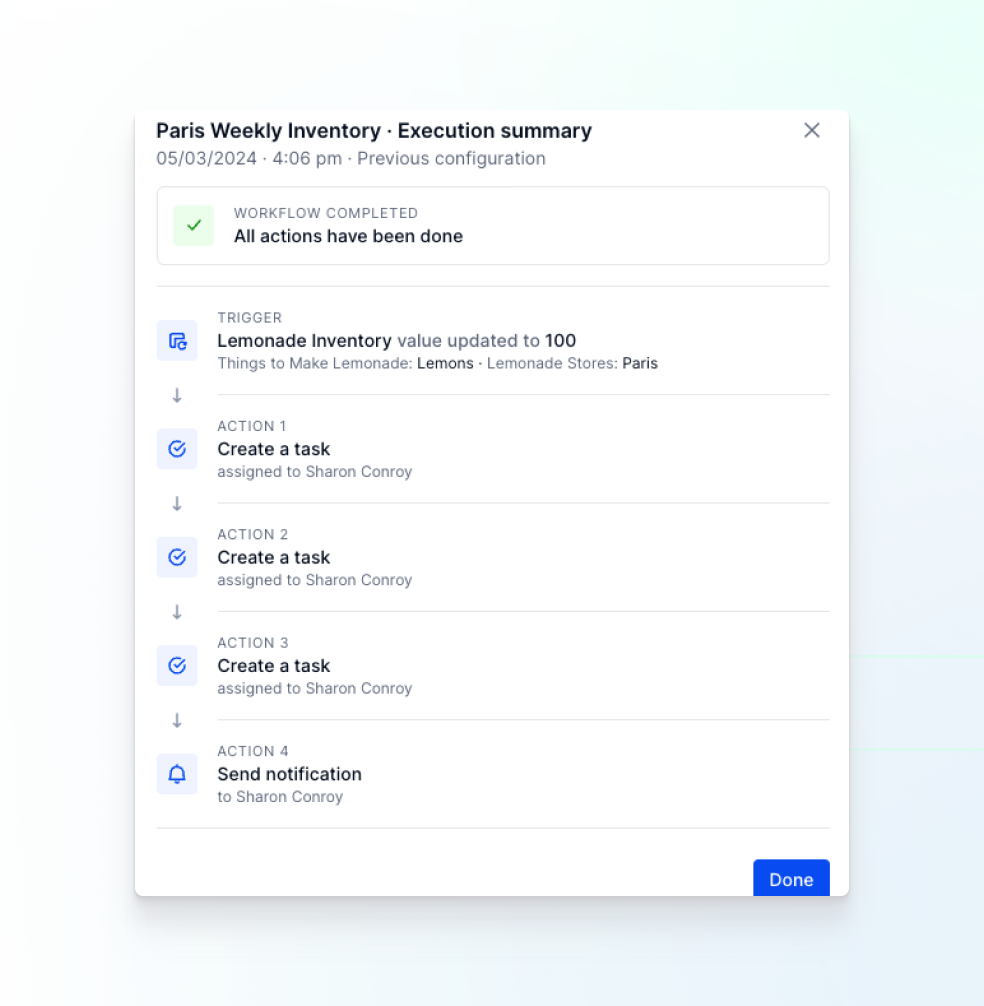
The first step in creating a workflow is to create an Automation with a notification or a task.
Check out the Pigment Automations overview video in the Academy!
We’ve summarized the required steps below for you:
- Create an Automation.
- Establish a trigger.
- Create an action.
This can be a notification or a task. - Select assignees.
- Enter task details.
- Set a due date.
- Set up the task redirection.
- Click + Add an Action.
In Pigment, you can include up to 10 actions in a workflow. - Select either Send notifications or Create tasks.
As you add each new action to your workflow, the corresponding number count for each action increases. - When you’re finished, click Save at the top of the screen to save your new Automation.
When it’s triggered, the automation starts a workflow with your series of notifications and tasks.
New Automations are not activated by default. Open the Settings page, and then Automations, use the toggle switch to activate the Automation.
Administer the Workflow
Application Settings
In the Settings page, you can view the Automations available in your application. Here you can sort, filter, and search, as well as perform the following actions:
- Show or hide the Automation’s history
- View a summary of the Automation execution
- Edit the Automation
- Duplicate the Automation
- Change the Automation owner
- Delete the Automation
Task Management
Click Task management in your Pigment sidebar. This displays a list of Automations and their associated tasks in your applications.
Tasks have a numerical prefix, this indicates the number of tasks in the Automation. Let’s say you have a task with the prefix 1/1, this is a single task. However, if a task has the prefix 1/3, this is the first task in a workflow containing 3 tasks. Depending on the completion status, each action in the workflow sequence changes from To do, On hold, and Done.
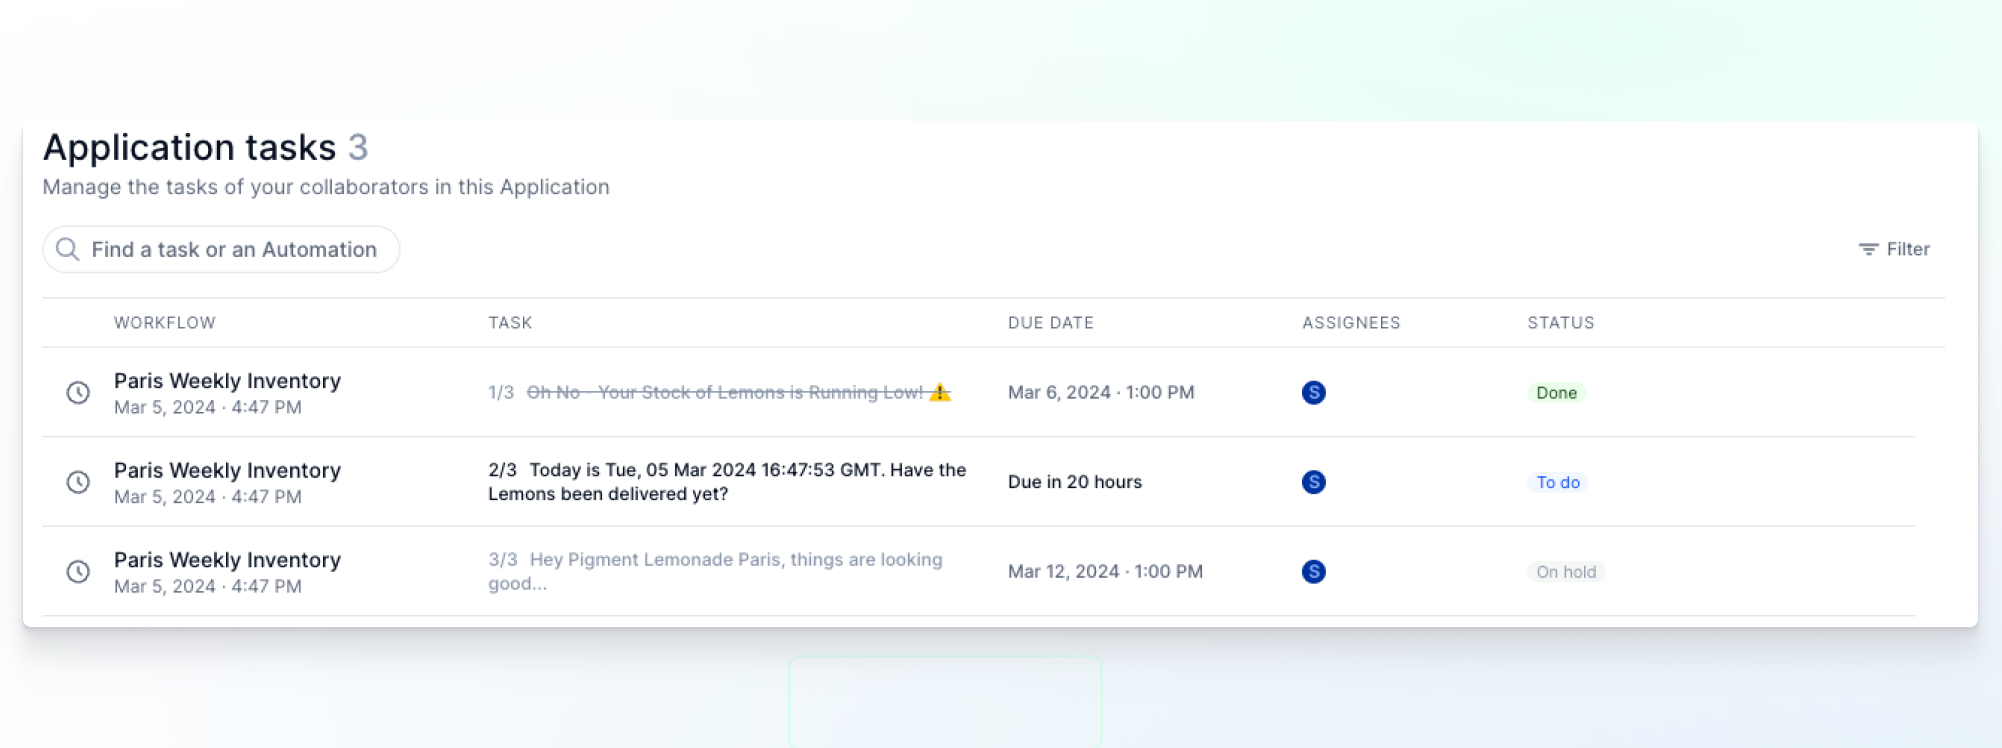
To Do status
When an action status is To do, this means that its assignee hasn’t started working on the action yet.
You can use the menu (...) on this status to do the following:
- Mark task as done. The status changes to Done - simple! If there are other task assignees, then the task is marked as Done for everyone. The task disappears from everyone’s My Tasks list, but the task can be viewed in the list of Done tasks.
- Update assignees.
- If you remove a task assignee and replace it with a new assignee, then the task disappears from the original assignee’s My Tasks list, and they no longer receive notifications. The new assignee receives the task, and the corresponding notification.
- If you add a new assignee to a task, then the new assignee receives the new task. The next reminder is sent to both the original and new assignee.
- Send reminder. Resend a reminder to all task assignees.
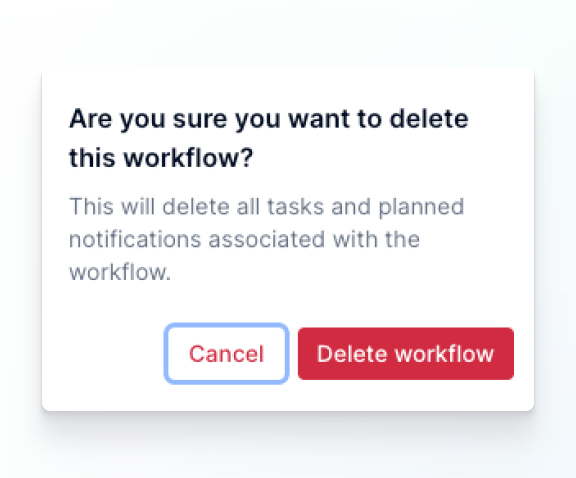
- Delete workflow. If a workflow is deleted, any associated tasks or notifications disappear from the assignee’s My Tasks list and are no longer available.
On Hold or a Done status
When an action status is On hold, the previous action in the workflow is not yet complete. When an action status is Done, the workflow moves onto the next required action in the Automation sequence.
You can use the menu (...) on either of these statuses to do the following:
- Go to the task
- Delete the workflow
Locating Specific Tasks or Automations
- Click Filter to locate Automations and tasks according to the following:
- status
- trigger date
- workflow name
- associated tasks
- due date
- assignees
- Search all Automations by entering the task or workflow name in the Search field.
-
An alert stating the number of any overdue tasks is displayed at the top of the screen. Click Review to display them.
-
Hover over an application task to view more information.