


When populating or creating a list in Pigment, there will be instances where you need to bring in data from a csv. This article will show you how to populate list data using a csv file. Not all lists need to be created via an import, check out this article on how to create and configure a list manually.
Table of Contents
Populate a List with data from a CSV file
If your list is already created, you can import all the items and property data, just click on the Top right icon > "Import Data..."

Starting from an import
You can also create a list and its properties as you are creating the list, just select Start from an import. In both cases, list already made and starting the list from an import, the process below is still the same.

Upload your CSV file
You can drag and drop your csv file onto the screen or select the file from explorer.

Note
This process follows the uploading of a file, you can also use Integrations.
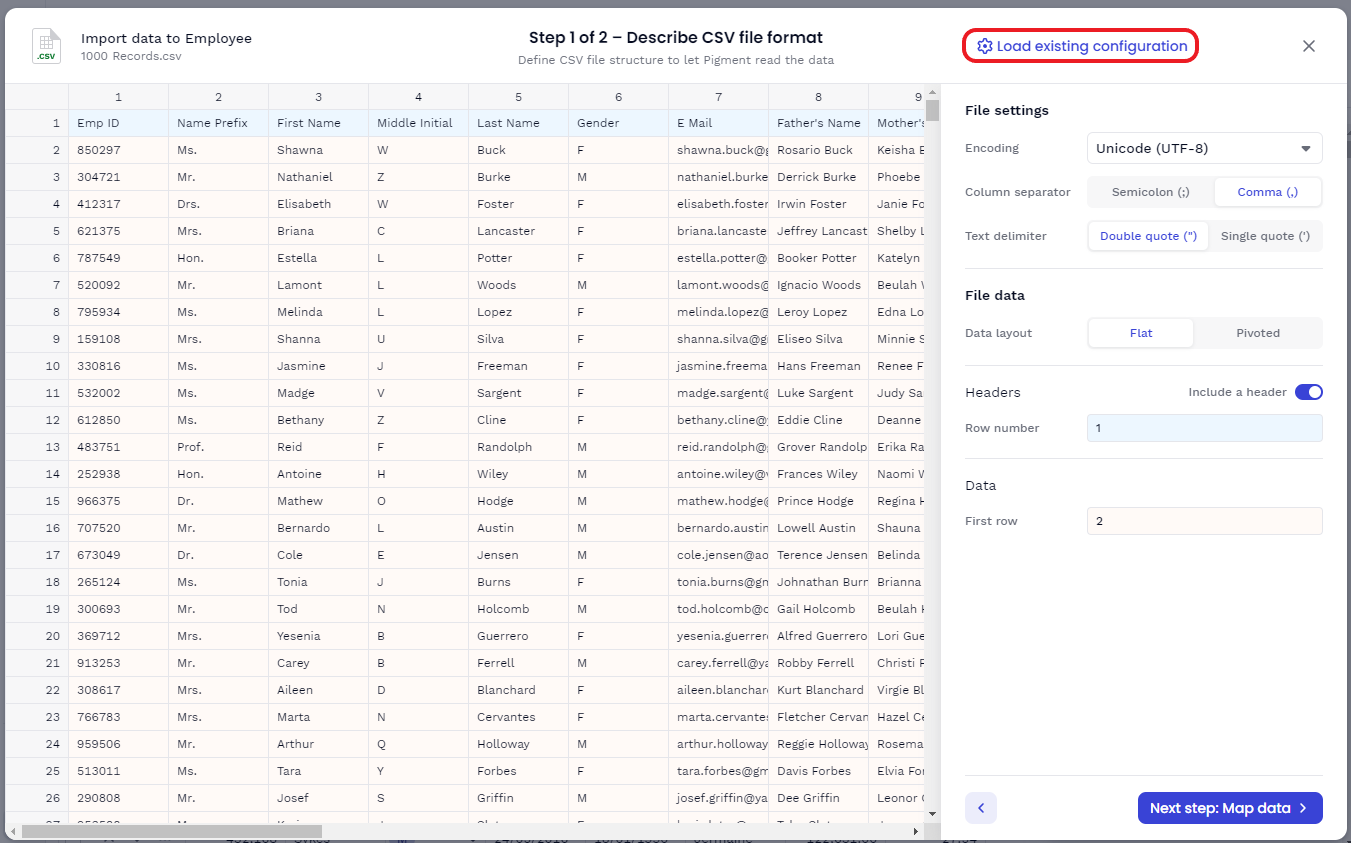
Step 1: Define the CSV file format
This step will allow you to configure the way Pigment should read the uploaded CSV file.

File settings:
-
Encoding: if some special characters are not interpreted correctly in the preview, it is likely be related to the encoding setting. Check which encoding is used by your CSV file.
-
Column separator: Select the separator between each column (
,or;) -
Text delimiter: Select the Text delimiter (
”or’)
File Data:
Pigment supports 2 different types of Data layout:
- Flat: This mode is designed to support CSV import files which contain only column headers. Each line represents a different List item. The "Flat" mode is more suited to import to a List.
example of a "Flat" CSV file :
| ID | Name | Country | Gender |
|---|---|---|---|
| 1 | Bob | FR | M |
| 2 | Mary | DE | F |
| 3 | Lisa | UK | F |
- Pivoted: This mode is designed to support CSV import files that contain headers in both rows and columns. The "Pivoted" mode is more suited to import to a Metric.
example of "Pivoted" CSV file :
| Jan 21 | Feb 21 | Mar 21 | Apr 21 | Jun 21 | Jul 21 | Aug 21 | |
| FR | 100 | 200 | 150 | 45 | 100 | 200 | 80 |
| DE | 200 | 100 | 200 | 150 | 45 | ||
| UK | 160 | 100 | 200 | 150 | 45 | 0.00 | 0.00 |
When the "Flat" Data layout is used:
| Headers
Data
| 
|
When the "Pivoted" Data layout is used
| Headers
Data
| 
|
Add load date
You can add the date and time as a mappable column to your imports. This option will create a new column in your import with the time and date of your data load. When you toggle this functionality on, you will see Select a Time zone. By default, it will pull your local time zone, however, you can adjust to which time zone the date and time should come from.
The date will come in as yyyy-mm-dd hh:mm :ss and can be imported into text or date-formatted mappings.
Additional constant value
Additional constant values allow you to add mappable data to your source file. The data can only contain one value for the entire import. The Source name field is used to define the column that will be added to your file. This is the field that you will map in Step 2. The Value field is the value that will be imported.
For example, if you had a file that was for a particular product, Product A, but this data was not in the file. You could create an Additional constant value with the Source name of Product and Value set to Product A. This data would appear on the file in Step 2, and you could then map it to the correct Source
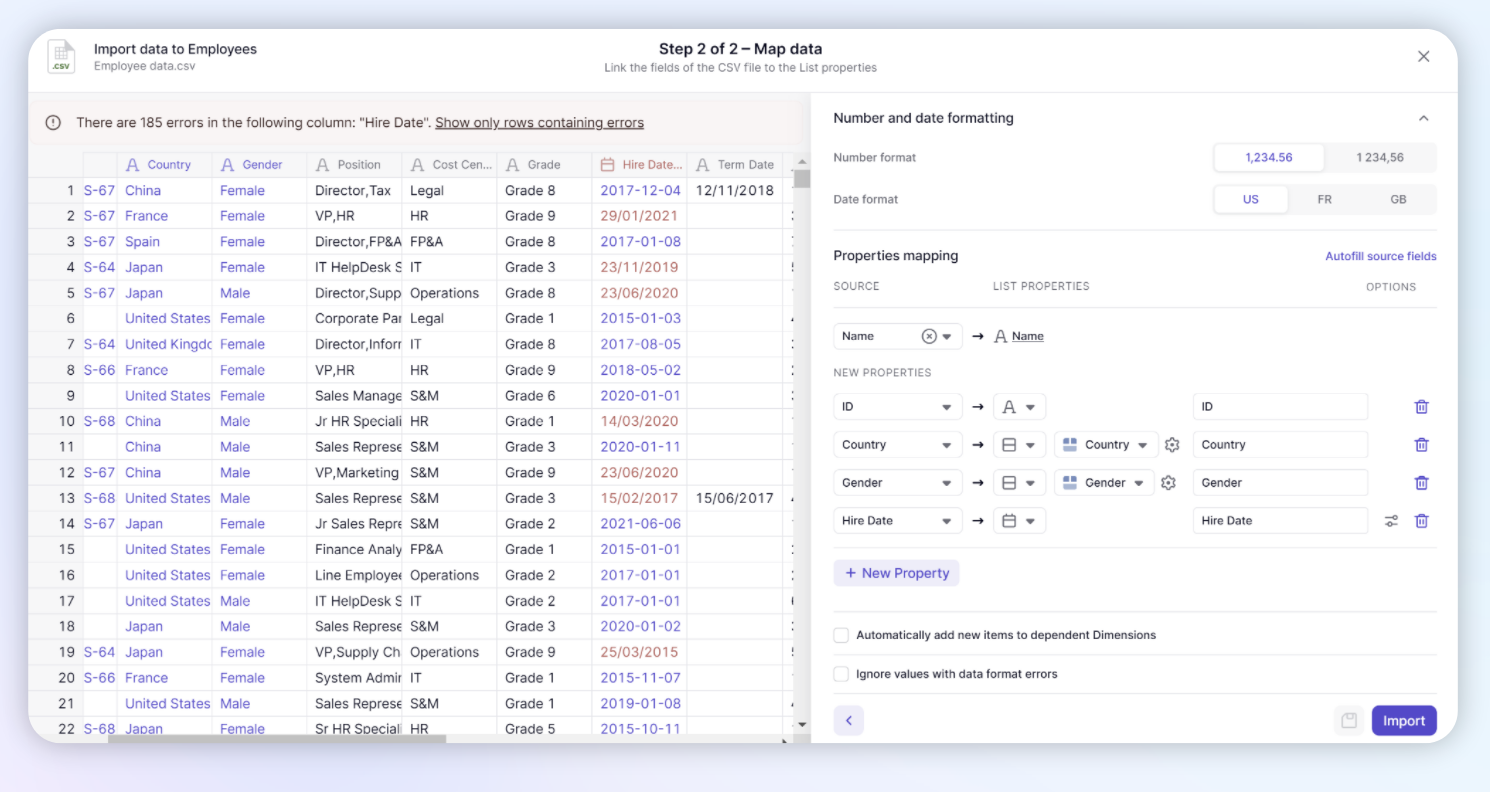
Step 2: Map the Data
Now that you configured how we should read the file, you need to configure where the data should go and how to read the data within the file.
Define the file number and date formatting
In the top right, you’ll see the Number and date formatting, this will determine how Pigment interprets data for the entire file. If you have multiple date formats, custom formatted dates, prefixed and suffixed data, or other specially formatted data, check out how you can set column-specific data definitions by selecting the Option icon next to the specific property you want to define.
Number Format:
“1,123.45” : understand numbers with . as decimal separator and , as thousand separator
“1 123,45” : understand numbers with , as decimal separator and as thousand separator
Date Format:
Most standard date formats are correctly interpreted by any of these options. Here are the standard date format details;
US: Follows American Date format standard ( ex: “01-02-2022” is Jan 2nd, 2022)
GB: Follows European Date format standard ( ex: “01-02-2022” is Feb 1st, 2022)
FR: Follows European Date format standard ( ex: “01-02-2022” is Feb 1st, 2022) and understands Date written in French words( ex: “Février 22” is Feb 1st, 2022)

Align your column headers to the corresponding data
For each Property of the List, select the corresponding column of the CSV file in the “Properties mapping” section of the side panel. If you have not created the properties, you can do so now be clicking + New Property.
After you align the Property with the file column, you need to select the data type.
Dimension data type
If you set your data type to Dimension, a new drop-down option will appear named Dimension. Here you can type in the name of the Dimension or select it from the dropdown. Didn’t create that dimension yet? Don’t worry, you can create it during this import. Type in the name for your new dimension, and select Create next to it. You’ll also want to check the box for Automatically add new items to dependent Dimensions, this will create new items in that list.
Automatically add new items to dependent Dimensions
When using this functionality it will be applied to all dimensions by default. However, you can click on the options icon next to toggle this off for dimensions you do not want new items added it.
| When selecting a data type of Dimension, you’ll also notice a cog wheel next to the selected Dimension, this allows you to define how Pigment identifies the items in the dimension. By default, the "Default Property" of the Dimension will be selected but you can select any other unique Property of the Dimension by clicking on the cogs near the Property. For example, here we have a Country list. In the Country list, there is also a defined unique property called Country Code. If our file contained country codes vs the country name, we can use this to identify each country. | 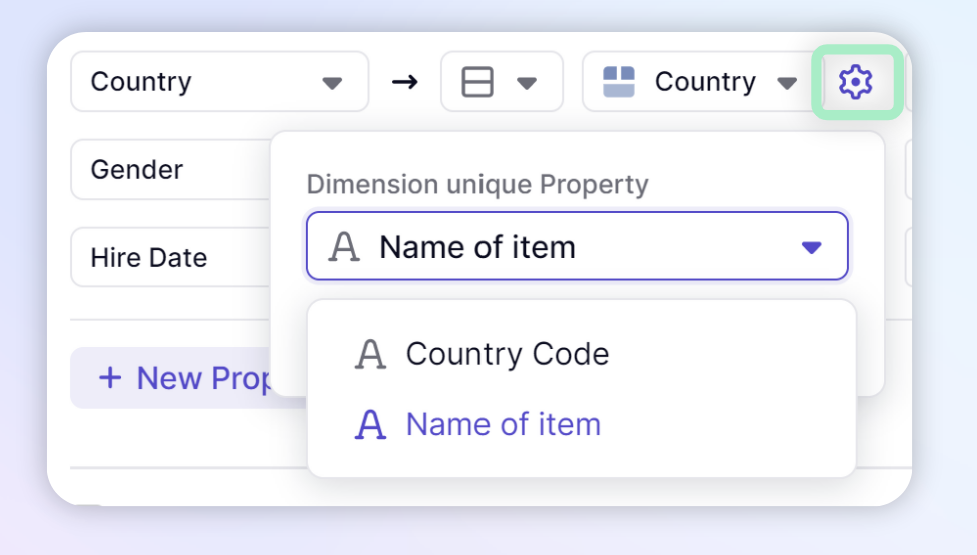 |
Note
If you want to format a List Property as a dimension but have not created that dimension yet, you can create the dimension from within this import.
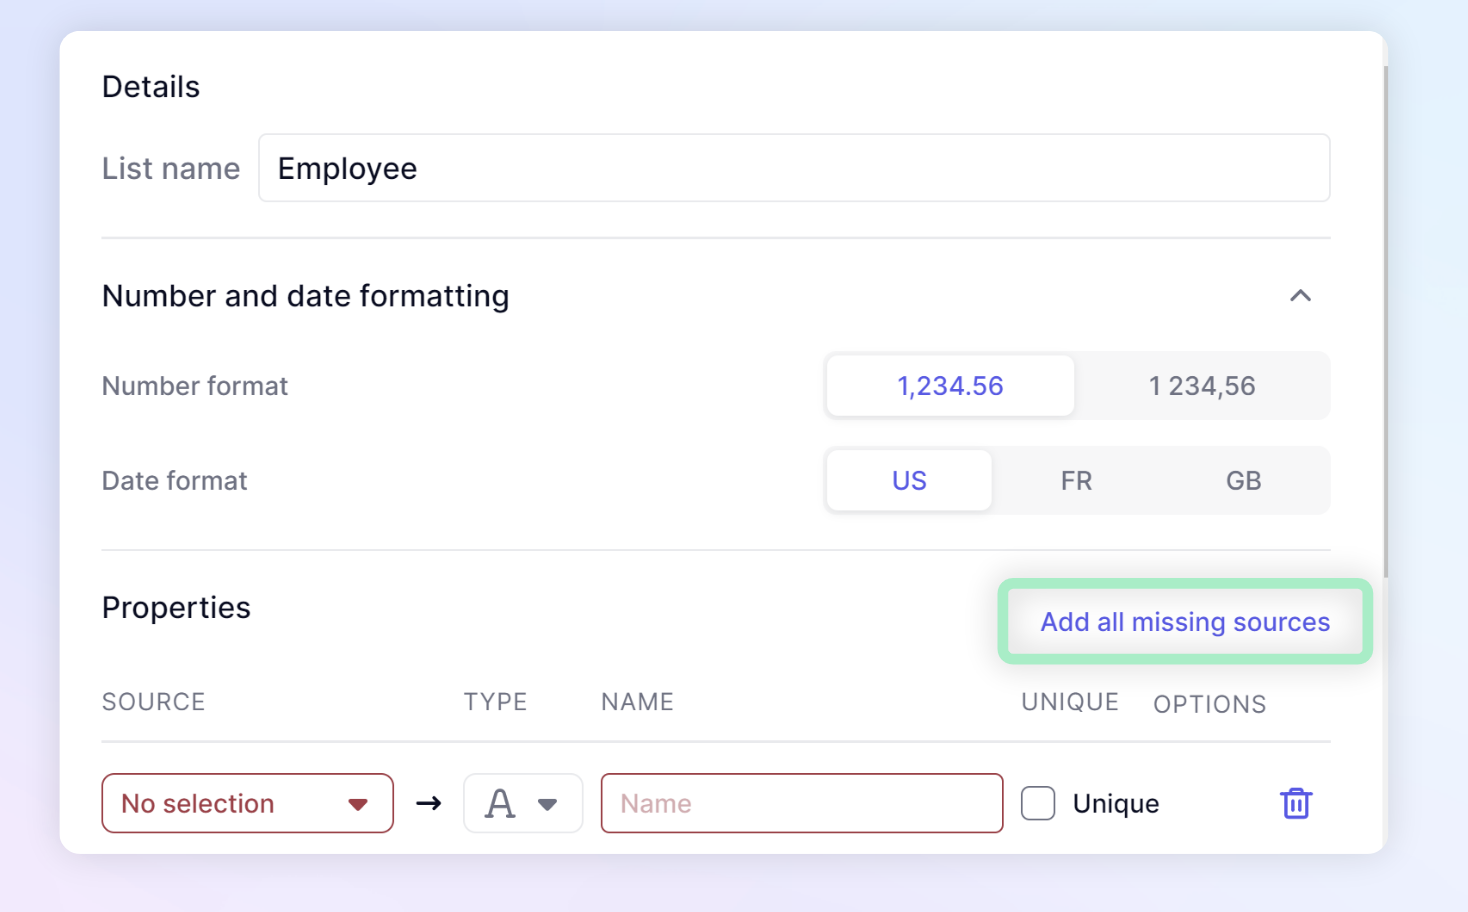
Add all missing sources
To use the Add all missing sources feature, you must create the new list from Import.
Add all missing sources will instantly create a List Property for all unmapped columns in your list import. With just the click of one button, Pigment will create a property using the column header as the name. You will still need to adjust the Data type as they are all created as Text.
Check column mappings for errors
Each CSV column that is mapped will be colored in blue. When you import data into a Number or Date typed Property, values which cannot be parsed correctly will be highlighted in red. Until those errors are solved, you won't be allowed to trigger the import unless you use the option to “ignore values with data format error”. In that case, blank values will be imported.
Once you are done with the configuration, click on the "Import" to launch it!
Note
If you have multiple date formats, custom formatted dates, prefixed and suffixed data, or other specially formatted data, check out how you can set column-specific data definitions by selecting the Option icon next to the specific property you want to define.
Clear Items prior to import
In Transactions lists, there is the ability to Clear Items prior to import. This functionality will delete list items that are not located in the imports.
This option allows you to clear items present in your Transaction list and replace them with items from the imported data. Once enabled, you have two options to define which items are deleted from the list. The default setting would be the entire list, the other option is to define a limited scope of items to be deleted.
Import summary & saving your configurations
| Once the import is finished, a report will show how many items have been created and updated in the List. If the "Automatically add new Items to dependent Dimensions" option has been enabled, you will see the number of new items that were created during the import under Dependent Dimensions. By hovering over the (i) you will have a sample (up to 10 values) of created items. | 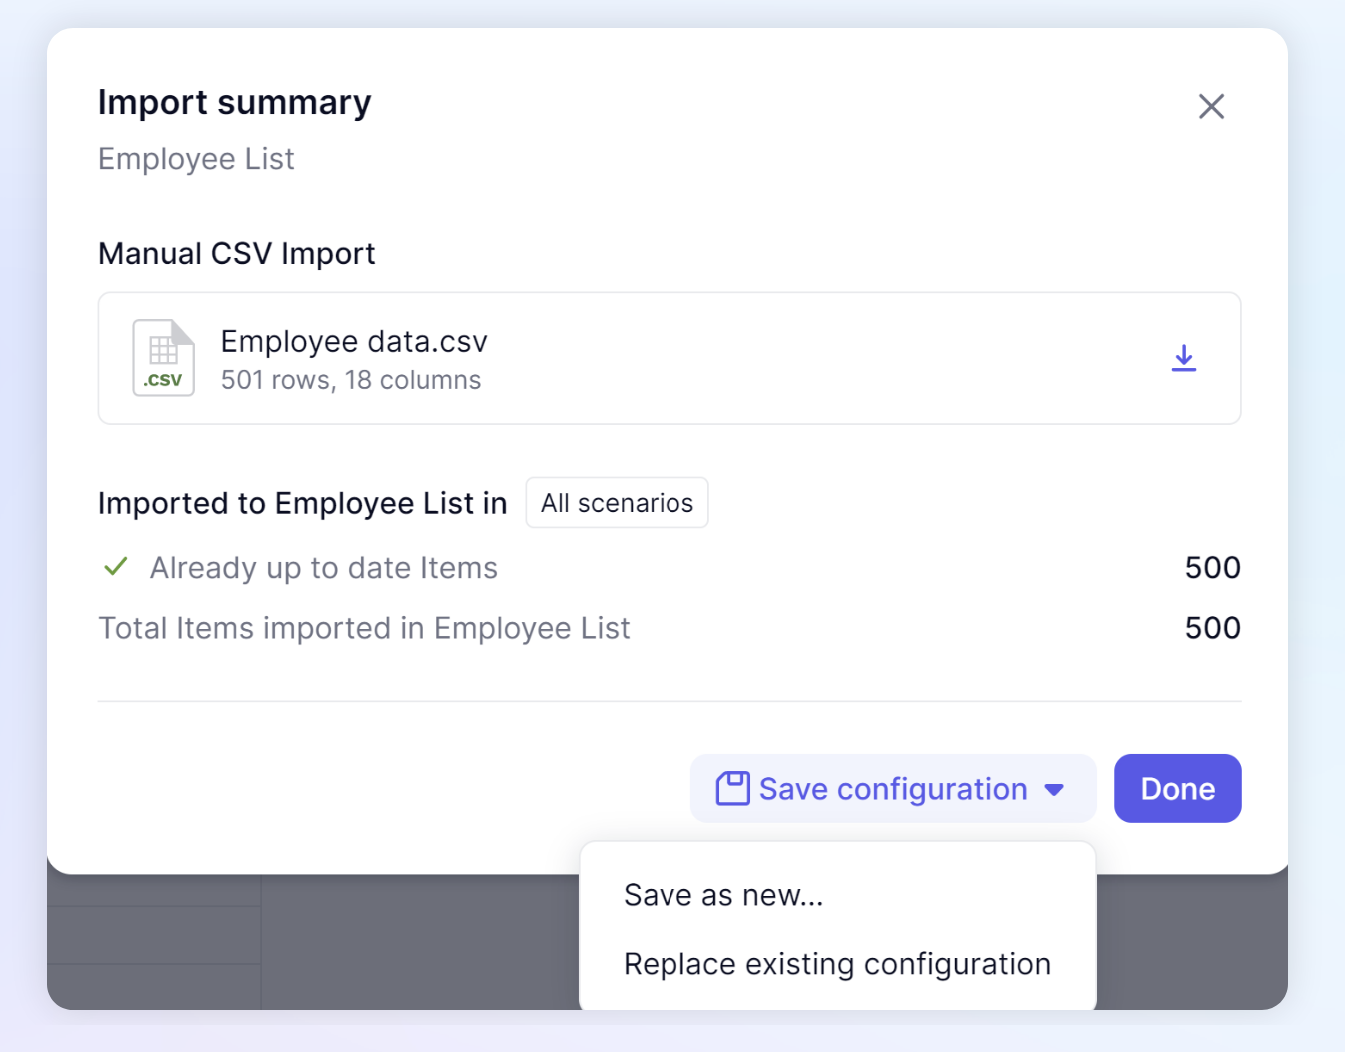
|
| If you plan to run this import multiple times, you can save the import configuration (Step 1 and Step 2) by selecting the "Save as new.." option. It can be triggered either before launching your import (step 2) or after the import (in the import summary). You can also replace an existing configuration for imports with the same data source. | 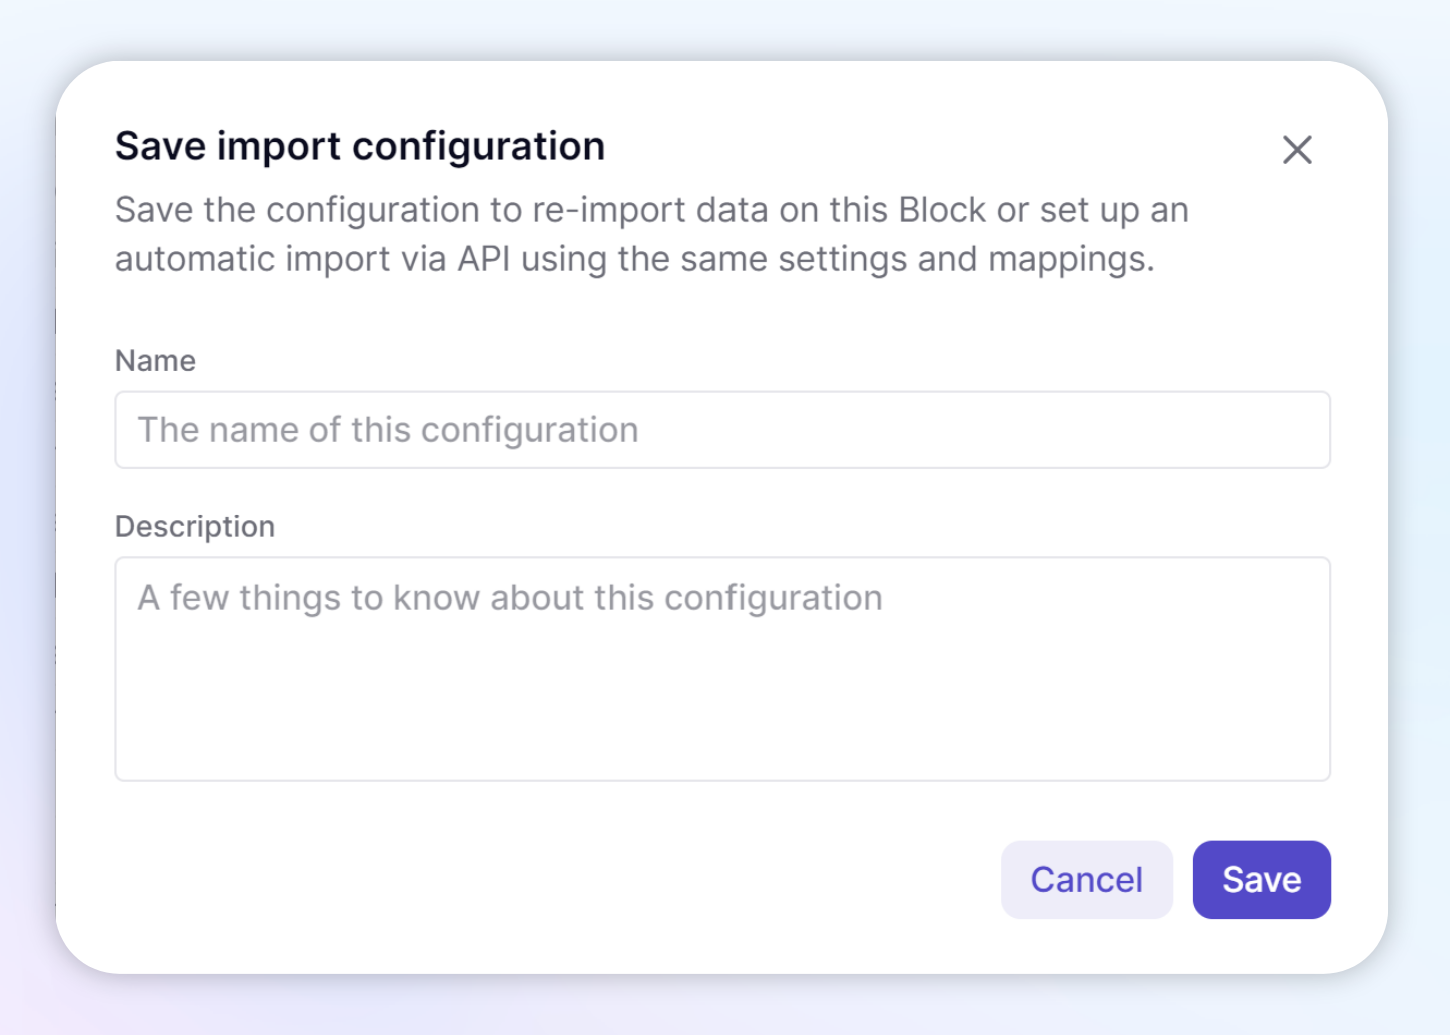
|
Note
Once the import has been completed, you can find this Summary again in the "Update History" of the Block. The summary will be saved for 90 days.
Save your import configuration
If you plan to run this import multiple times, you can save the import configuration (Step 1 and Step 2) by selecting the "Save as new.." option. It can be triggered either before launching your import (step 2) or after the import (in the import summary).
To reload this saved configuration, use the "Load existing configuration" button (Step 1).
This will load the configurations for both step 1 (CSV file format) and step 2 (data mapping).
See also:
Setting up properties in lists