


Metric to Metric importing allows you to import from on Metric to another Metric with the same dimensions and data type. These imports can be saved and triggered by an action widget or set as a scheduled import. This article discusses use cases and how to configure Metric to Metric imports.
Table of Contents
What is Metric to Metric Importing?
Metric to Metric import provides the ability to use a Metric data as the source for data. Metric to Metric importing will work for Metrics with the same dimensions and data type. These imports can be saved and then scheduled or triggered using a button. They can be used to import data from one Scenario to another within the same Metric, or can import from one Metric to another Metric with the same dimensions and data type. These imports will only bring in populated data and Blanks in the source Metric will not replace data in the target Metric.
All source Metric values, formula values and overrides, will be imported into the target Metric, as if they were hardcoded inputs. As opposed to the “Clone data to” functionality which is only pushing inputted and overridden data and not the formula ones.
Members must have Import data permission and Read Access rights on the Source Metric to be able to import into the Target Metric.
Imports must match Metrics in terms of both dimensions and data type. However, you can choose different Scenarios as sources or targets for importing.
How can you use Metric to Metric Importing?
There are several different ways you can use Metric to Metric importing. The key thing to remember is that your dimensions and data type must match. If a Metric does not have the same dimensions and data type, it will not appear in the Source dropdown.
Reduce recalculations by scheduling Metric Imports
Metric to Metric imports configurations can be saved and scheduled to be run at different increments. This allows you to disconnect metrics that do not need to be updated in real time and rather can be updated, daily or weekly for example. The main benefit of disconnecting parts of your model is that your model will not need to recalculate as much and therefore will perform better.
Use cases:
- Control the flow of data between Applications. If you don’t need data changes to impact other Applications in real time, you can use Metric importing to disconnect Applications. You can either schedule Metric imports on Shared Metrics or use an action widget to trigger them reducing the number of calculations and giving you better control over your data flow.
- Reduce calculations for Metrics designed for exporting. Large Metrics that have been built to export outside of Pigment on a regular basis can be disconnected and imported into before exporting to an outside system. These large Metrics can be aggregations of many other Metrics or require formulas that need to be computed once before the export takes place. In instances like this, where a formula is required to be performed and you can’t import directly into the Metric to be exported, you can create intermediate Metrics. These intermediate Metrics can be imported into from source Metrics and then referenced in the formula from your larger export Metric.
- Reduce unnecessary recalculations from Access rights Metrics used in a Access rights Rule. Each time an Access rights Metrics is recalculated it can impact a large part of your application. That’s why reducing Access rights Metrics recalculations can significantly improve your model performance. To do this, set up a Metric to Metric import in place of the formula from your Access rights Metric. You can then schedule this import to be run at a lower frequency.
Replacing the formula in an Access rights Metric means that if a new Member is added, they will not have the current Access rights configuration until the import is run. Please discuss with your Solution Architect before implementing this practice.
Freeze data: transform formula data into inputs
You can use Metric import to freeze values that have been computed through a formula. This is relevant when you build a Changelog in your application or when you want to freeze output values to make sure they are not going to change anymore.
Pull data from on Scenario to another Scenario
Metric to Metric importing can be used to import data from one Scenario to another within the same Metric or even into another Metric. This can be used to send inputs from one Scenario to another. However, its important to note here that Blank values will not be included.
Validate data before connecting to calculations
Data coming from outside data sources can be reviewed and validated by creating a staging or intermediary Metric for the data to be imported into directly from the outside system. Once numbers are validated, you can run an import into a connected Metric. This can set up for Members to view and validate data on a Board. Then use anaction widget assigned to the Metric import from the staging Metric to the connected Metric. Once the data has been validated, the Member can trigger the import with the action widget.
How to set up Metric to Metric Importing?
To set up a Metric to Metric import, first open the Metric that is being imported into, this is called the target Metric. The Metric that you are pulling the data from, this is called the Source Metric.
Members must have Import data permission and Read Access rights on the Source Metric to be able to import into the Target Metric.
Once you are in your target Metric use the following steps:
- Click the
…menu in the top right and click theImport Databutton. - Select
Pigment Metricfrom the top bar. - Use the dropdown to select your Source Metric, or the Metric you wish to pull data from.
- Use the dropdown to select your Source Scenario, or the Scenario you wish to pull data from.
- Click
Set up Import. - Click
Saveto save the import configurations to run from an action widget or to schedule or clickImportto run instantly.
Clear values prior to import
Before importing, clearing values provides the option to remove either all data from the designated Metric or a specific subset of data.
Click the Clear values prior to import toggle to clear the data in your target Metric before importing in the new values.
There are two different options, All values and Limited Scope.
All values removes all data from the entire Metric. Limited scope allows you to define if only some of the Metric’s data should be deleted and not all of it. It is dependent on two factors, the dimension or dimensions selected, and the items from that dimension that contain data.
How limited scope works
Limited scope allows you to clear a defined area of the Metric. This allows you to clear certain areas within a Metric, while leaving other areas untouched.
When you select Limited scope, you will be given the option of choosing one or more dimensions. This controls the scope of which data is cleared. If you select a dimension, if there is data associated with an item in that dimension, that item’s data will be cleared before the new data is imported.
For example, when you choose the Month dimension, the months containing data in the source Metric will determine which months should be cleared in the Target data. If, in the source Metric, data is present for January, February, and March, this implies that the target metric will have its data cleared specifically for these months—January, February, and March—during the import process.
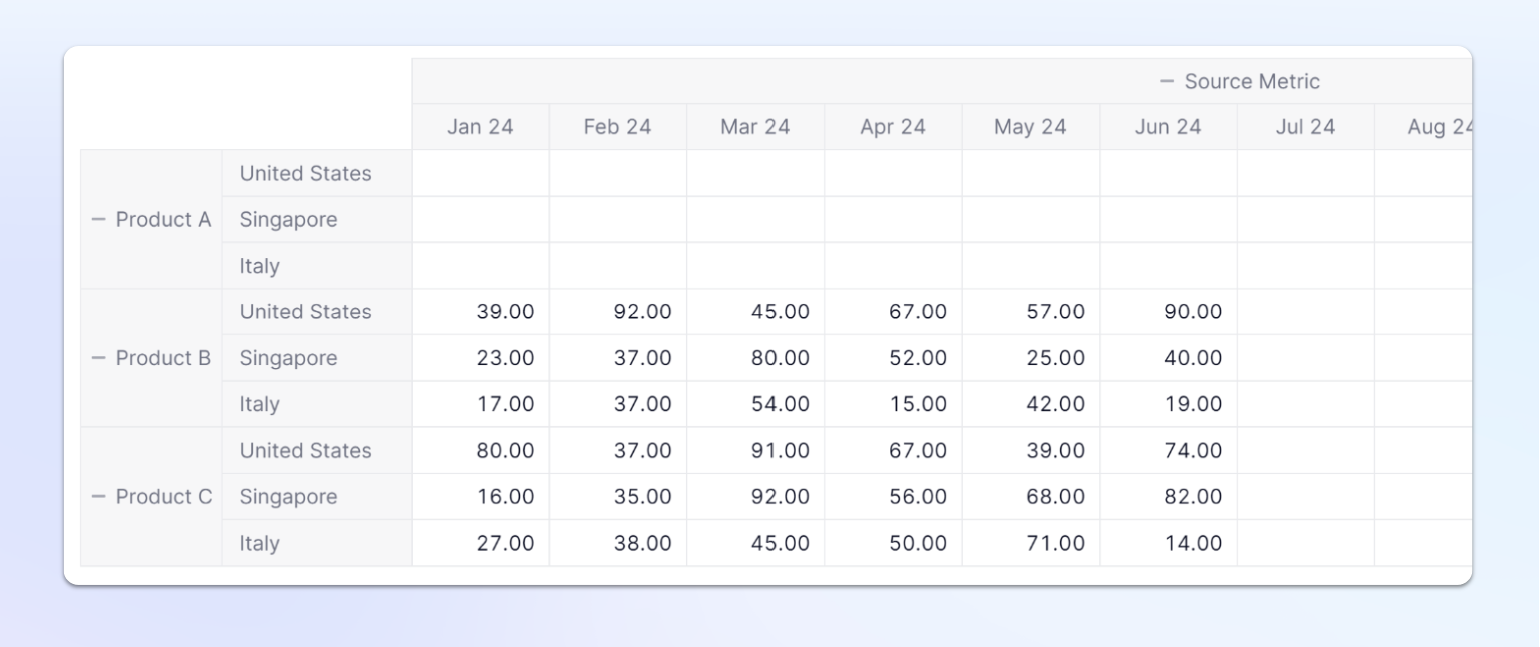
The source Metric above is made up of 3 dimensions, Months, Products, and Country. Lets look at this and what the outcome would be depending on which dimension you selected.
- Months - All existing data in Jan, Feb, Mar, April, May, an Jun, would be cleared before importing. This clearing would go across all Products and Countries that had data in those months. Any data in other months, such as July, Aug, Sept, would not be impacted by this import.
- Products - All data for Product B and Product C will be cleared and replaced by data in this Metric. There will be no impact to Product A because there is no data in the source Metric.
- Country - All data in the target Metric will be cleared. This is because there is data associated with every country and therefore all it will clear every country’s data.
- Months & Products- When choosing multiple dimensions, any cell where there is data linked to to both dimension will qualify for clearing. In this example, all data associated with Products B and C and in the months of January to June will be cleared prior to importing.
Selecting multiple dimensions in a limited scope will expand the area that is cleared because more conditions can be met.
When using a limited scope, you can choose one or more dimensions, such as Months or Products. If there is existing data associated with the selected dimensions in the source metric, that specific data will be cleared in the target metric before importing new data. This process allows for the precise removal of data in defined areas, preserving clarity and control over the imported information